Contact us


The system is building your webshop. Please wait...
Introduction to Selltico
You have opened an online store and need additional help to set up the store the way you want? When you open an online store, you have 14 days free trial period to explore the platform's capabilities. In this user guide, we will explain all these capabilities and help you to get started with the Selltico platform.
Setting up a shop is simple and has only three (3) steps:
Your shop is now opened. Then there comes product entry, filling in data about the shop, logo entry, banners and sliders and content entry. During the free trial the shop is on sub - domain. After you have decided to start selling and use Selltico, you choose a plan and move to your own domain. If you don` t need a trial period, after registration and setting up the shop, you may immediately choose a plan.
Redirecting to your domain In order to transfer Your new online store to Your domain, you need to change the A record in the DNS settings and enter the IP address 94.130.216.109. If you do not have experience working on domains, pass this information to the site administrator or contact your domain registrar.
1. Users
On this page you may find your information (First Name, Last Name, Address, Email, Place, Telephone, State). You can change the information on this page.
2. Plans
On this page choose the plan that is convenient for you.
3.Change your password
On this page you can change the password for logging in on the admin panel.
4. Invoices
You will receive a list of invoices formed on monthly basis relating to a chosen plan of your shop.
5. Domain settings
On this page you can set the name of your domain.
6. Shop Admin
By clicking the Shop Admin link you are taken to the administrative panel of your shop.
You can register it at your provider or you can allow us to register a domain for you.
If you wish to register a domain yourself, we suggest using Loopia.
After a successful registration, you can connect your domain to your shop by filling in forms on the left side.
Suggestion: If you already have a site on your domain and you do not wish to change it, you only want to add the functionality of the shop to the already existing site, we suggest creating a subdomain e.g. (shop.youradress.rs) which you will connect to the shop in the same way as the main domain.

To create an e-mail list of addresses you already have, that is, contacts you have already communicated with, customers, clients and friends; fill in any application form for newsletter. We suggest Mailchimp because of its simple usage. Mailchimp is free up to 2000 addresses and 12000 mails sent per month which is fairly enough for the start. Later, you can use some of the Mailchimp paid packages or some other system for sending newsletters. Before all, it is necessary to think of the newsletter content. A suggestion is that those could be products which are on sale in that period and/or some interesting things in industry.
When you choose the option Invoice in your account you get a list of bills formed every month and all that relative to an already chosen shop plan.
On a list of accounts there is a date of the bill and if it is paid. A status realized emphasize that the bill was paid.
When you click on See, a detailed view of the bills is opened with all the invoiced items.

On page orders, there are:

To do this, the name of the customer, order number, and/or phone number is necessary.


In a drop-down menu you choose an additional status you wish to filter.
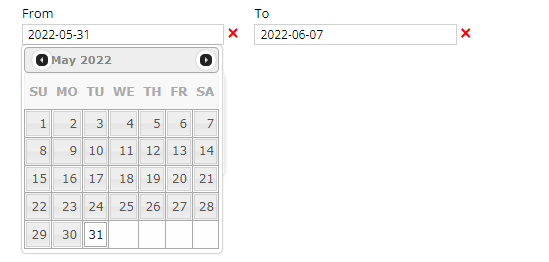
By clicking on `from` and `to`, a calendar will appear and we choose a period to check all the incoming orders.

Here you can find the following information:
Name and surname of a customer, order number, the date when the order was made, ordered products, the amount of the order in a chosen currency, telephone number, customer place and address.
A display of additional order statuses. You may create additional statuses on page Codebooks card - Status of the order.
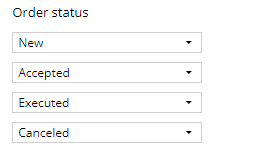
There are four statuses of orders:
- New - This is when goods are ordered from the site by a customer or when an administrator creates an order.
- Accepted - When an order is accepted that is a way to check the ordered products, the state of the ordered goods stock and customer data checking. When the order is accepted, it is considered that the previous checking was done.
- Executed - After the goods were sent and received by the customer, the realisation of the order is done; and by that the process of ordering, too.
- Canceled - This is undertaken when some of the previously mentioned conditions are not fulfilled.
There are two segments on the page:
1) Customer information
2) Information about the order

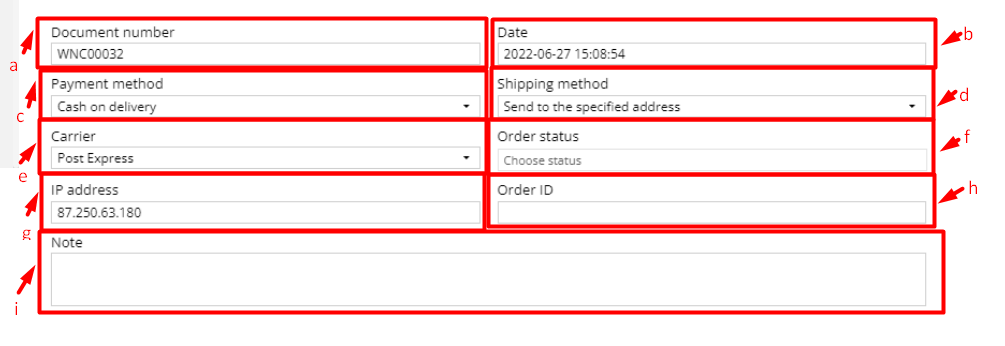
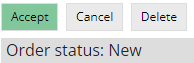
When an order is being created it gets a status NEW, and the following options become visible:
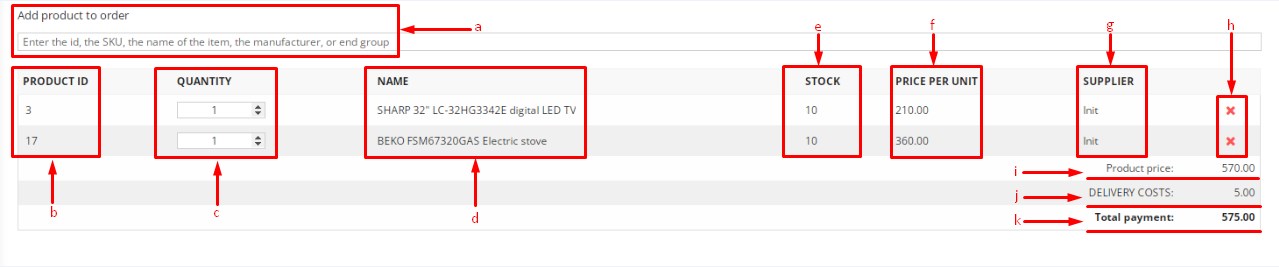
Below the status, a card for assigning of product to that order appears.

Clicking on the stated buttons you may take over: Form of the order (PDF), the form of the offer, and a form of accounting.
When order is proceeded, instead of proform invoice button, invoice button is displayed.


In the Products menu, we can manage products.
The page is divided into several segments:
By clicking on Categories you may view groups you have; you may select a group.
Products from a group or a subgroup are listed by choosing that group or subgroup.

1) Stock (our) -This filter displays products you currently have on your stock list,
2) Supplier stock If ticked YES, products in stock are shown. If ticked NO, it displays products a supplier does not have.
3) Sale -If ticked YES, it displays products on temporary sale. If ticked NO, it displays all products, not on sale.
4) Closed 4) If ticked YES shows items that are locked, and if ticked NO, it show items that are not locked.
5) On web - If ticked YES, it displays products visible on your page. If ticked NO, it displays products not visible on your page.
6) Active - If ticked YES, it displays active products. If ticked NO, it displays inactive products.
7) Images -If ticked YES, it displays products with an image. If ticked NO, it displays products without an image.
8) Description - If ticked YES, it displays products with descriptions. If ticked NO, it displays products without descriptions.
9) Characteristics (HTML) - If ticked YES, it displays products with HTML characteristics. If ticked NO, it displays products without HTML characteristics.
10) Characteristics (Generated) - If ticked YES, it displays products with generated characteristics. If ticked NO, it displays products without generated characteristic.
11) Characteristics (supplier) - If ticked YES, it displays products with characteristics taken over from the supplier. If ticked NO, it displays products without characteristics taken over from the supplier.
12) Characteristics (HTML) + FLAG - If ticked YES, the items that display HTML characteristics on the site are displayed.
13) Characteristics (Generated) + FLAG - If ticked YES, it displays products with generated characteristics on site.
14) Characteristics (supplier) +FLAG - If ticked YES, it displays products with characteristics from the supplier on site.
15) Weight - If ticked YES, it displays products with assigned weight characteristics. If ticked NO, it displays products without assigned weight
16) Tag - If ticked YES, it displays products with the assigned tag. If ticked NO, it displays products without assigned tags.
17) Filter pricing (Purchase price from - Purchase price to) enables the display of products depending on the price range `FROM` - `TO`, after we enter the pricing.

Option Select all selects all products in the table. You may use a key on a keyboard F3.
Option Unlock/Lock - used for unlocking and product locking. Locked products are not possible to change unless you unlock them.
Option Display on Web – post selected products onto a user's online shop.
Option Remove from Web - removes selected products from your online shop.
Option Sale - post chosen products on sale. On the left side you enter discount in percentages, while on the right you enter the date of the sale.
Option Remove - terminate sale on selected products.
Option Active - inactive products become active.
Option Inactive - active products become inactive and it removes them from the web.

Search is done according to the product identification number (ID), name of the product, supplier code and/or SKU of a product.
When you choose the last group where you have assigned the generated characteristics, a field Choose characteristics appear. When you choose it in a drop-down menu and check it by clicking on a key, all products with such assigned generated characteristics will be shown. If you click on the minus, products without that assigned generated characteristic will be shown. If you wish to see all the products, in a drop-down menu click on Choose and tick the box.

Filtering by the supplier – In a drop-down menu select a preferred supplier so that products of only that supplier are shown.

Filtering by manufacturer - In a drop-down menu select a preferred manufacturer, so products of only that producer are shown.

Filtering by warehouse – In a drop-down menu choose - select a preferred warehouse.

Filtering by type - In a drop-down menu select a preferred type.

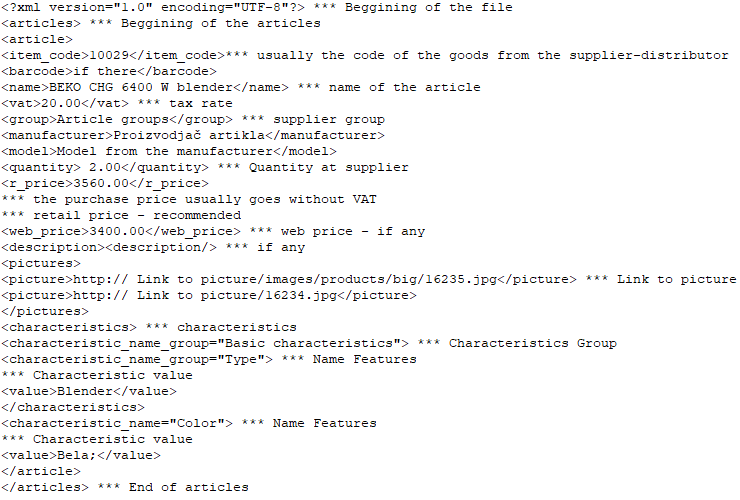
Import was created for you to ease your entry of the products using our defined structure. Four types of files can be imported:
On your computer select one of these files by clicking on Select data file. When you select a file, click on Import and wait for it to be finished. When it is finished, your products will be shown in a table on page Products.
Obligatory information in a file: Product code, product name and web price.
Follow the structure of the column in the file

Click on Add new product button leads you to the page where you create a product.
Information about display (b) - an icon Sale is shown when a product is on sale.
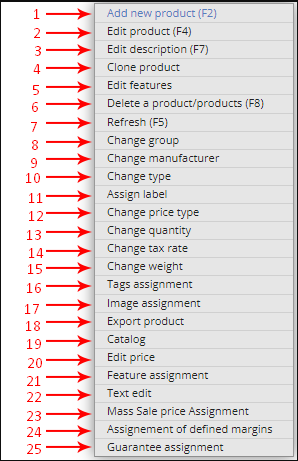
When a cursor is over the table, on the right-click will appear a drop-down menu where there are the following functions:
Add new product (1)The first option is Add new product. By clicking on this option, we move to a page on which we can create a product.
Edit product (2)Clicking on Edit product leads to a page where you can change the selected product.
Edit description (3)Clicking on Edit description leads to a page of selected product where you can change description.
Clone product (4)Clicking on Clone product leads to cloned data of a selected product. Clicking on save, a product is formed.
Edit characteristics (5)
Clicking on Edit characteristics opens a page and there you can change flag characteristics of the selected product, delete characteristics of the selected product and transform HTML characteristics into a description.
Delete product (6)Clicking on Delete product you delete selected products.
Refresh (7)Clicking on Refresh you refresh a page.
Change group (8)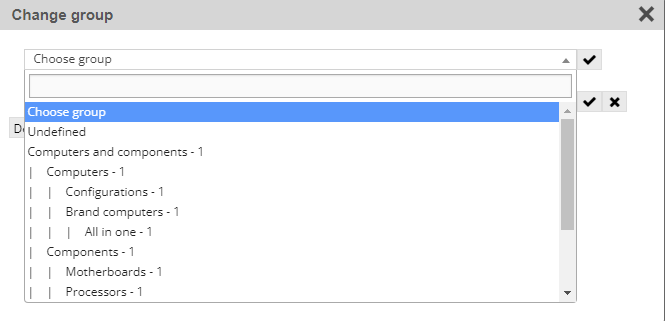
Clicking on Change group opens a window where you can change the group of selected items by selecting the desired group in the drop-down menu and confirming the entry on the button
Change manufacturer (9)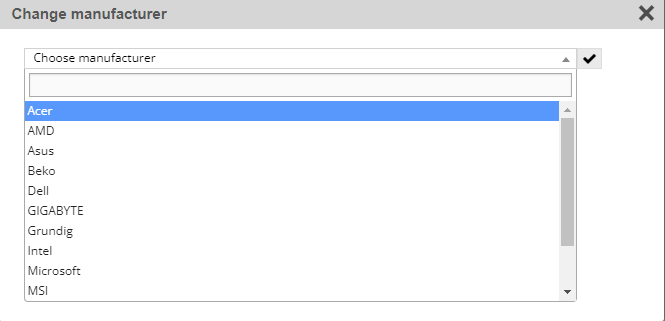
Clicking on Change manufacturer opens a window where you can change the manufacturer for the selected item by selecting the manufacturer in the drop-down menu and confirming the entry with the button
Change type (10)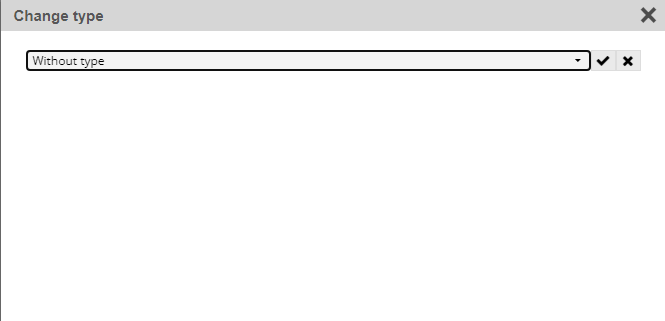
Clicking on Change type opens a window where you can change the type for the selected item by selecting the type from the drop-down menu and confirming the entry on the button
Assign label (11)
Clicking on Assign label opens a window where you can change the label for the selected item by selecting the label in the drop-down menu and confirming the entry on the button
Change price type (12)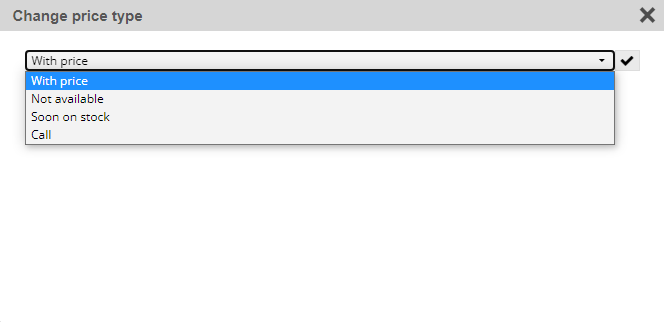
Clicking on Change price type a price window opens, and there you change the text on the button `Add in cart` with selected parameters in a drop-down menu.
Change quantity (13)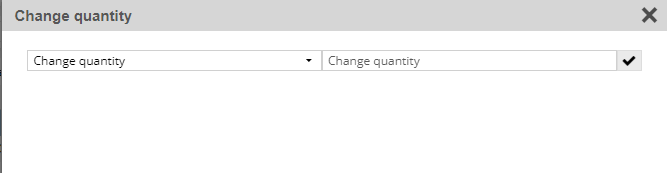
Clicking on Change quantity you change the quantity for a selected product.
Change tax rate (14)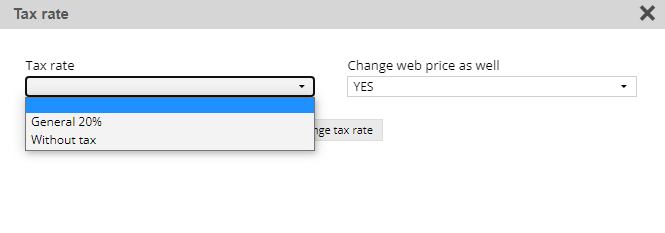
Clicking on Change tax rate you change tax rate for a selected product.
Change weight (15)
Clicking on Change weight you change weight for a selected product.
Tags assignment (16)
Tags can be assigned to more products at once. When you click on a certain tag, there is a list of products with the same tag. (To be shown in your shop, it is necessary to turn on the tags in settings).
Image assignment (17)
Clicking on Image assignment iit is possible to enter one image for more selected products. You first load an image by a click `Load new image`, then click on `Assign image` to assign the image to the product.
Export Product (18)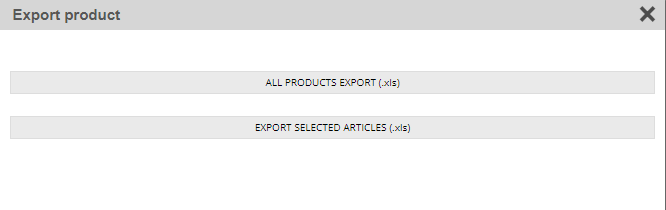
Clicking on Export product a window opens giving the possibility of exporting products to other platforms. In a drop-down menu, you select a platform to which products will be exported. To filter them use Yes and No; By clicking YES products for export are shown while clicking NO, products that are not for export are shown. This is done for products not to be doubled. Click X pops products from export. In a drop-down menu besides export, a file structure for export is selected. By clicking on Export, a file is created.
Edit price (19)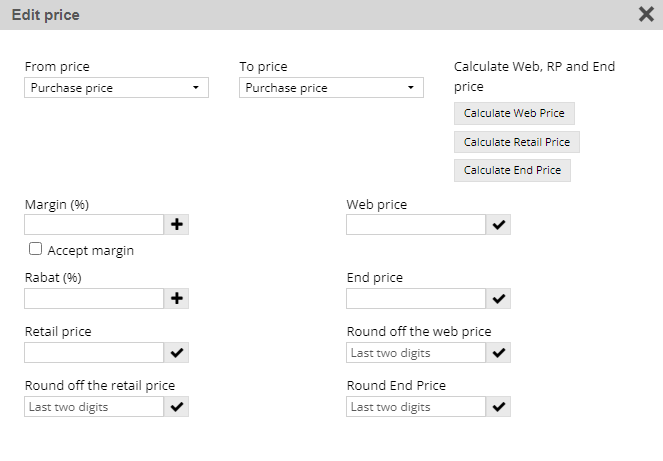
This enables you to simply correct product pricing, e.g. from web price to purchase price by adding margin and rebate. If you do not have a purchase price, you can directly enter the web price and retail price for the selected products. There is an option – a massive recalculation of the Web price and Retail price.
Characteristics assignment (20)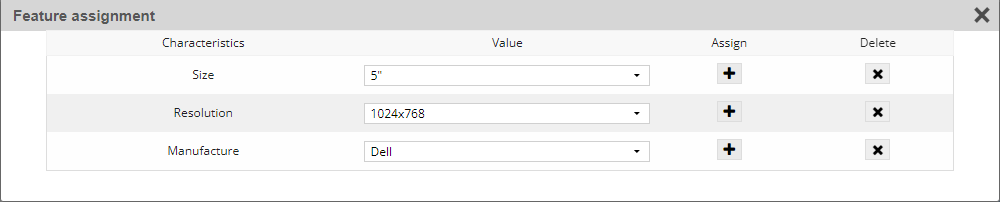
Clicking on Characteristics assignment you assign generated characteristics. They may be shown as filters for products or characteristics at the level of products.
Filters for products
Before assigning characteristics, they must be formed on the page Codebooks menu in the submenu Groups
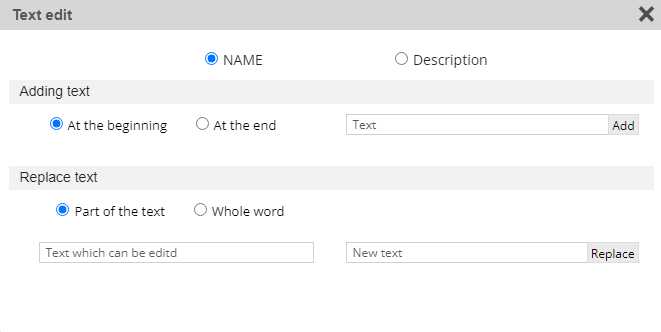
This is used to finish the correction of the name and product description quickly. You can add text and you can change it.
- Add text
You can add text at the beginning or at the end of the name of the product. You can also change a part of the text or a word.
- Replace text
You can change the existing text by writing a new text.
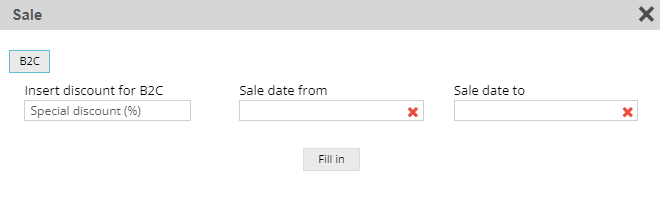
It sets up selected products for sale. On the left side, you enter sale discount in percentages, while on the right you enter the date till which a sale lasts.
Assignment of defined margins (23)
By clicking on this option, you set the defined margins for selected products.
Guarantee assignment (24)
This option allows you to enter the number of months for the product warranty, as well as set the warranty as an extensive warranty.
You can enter products in two ways: by Quick entry and by Detailed entry.
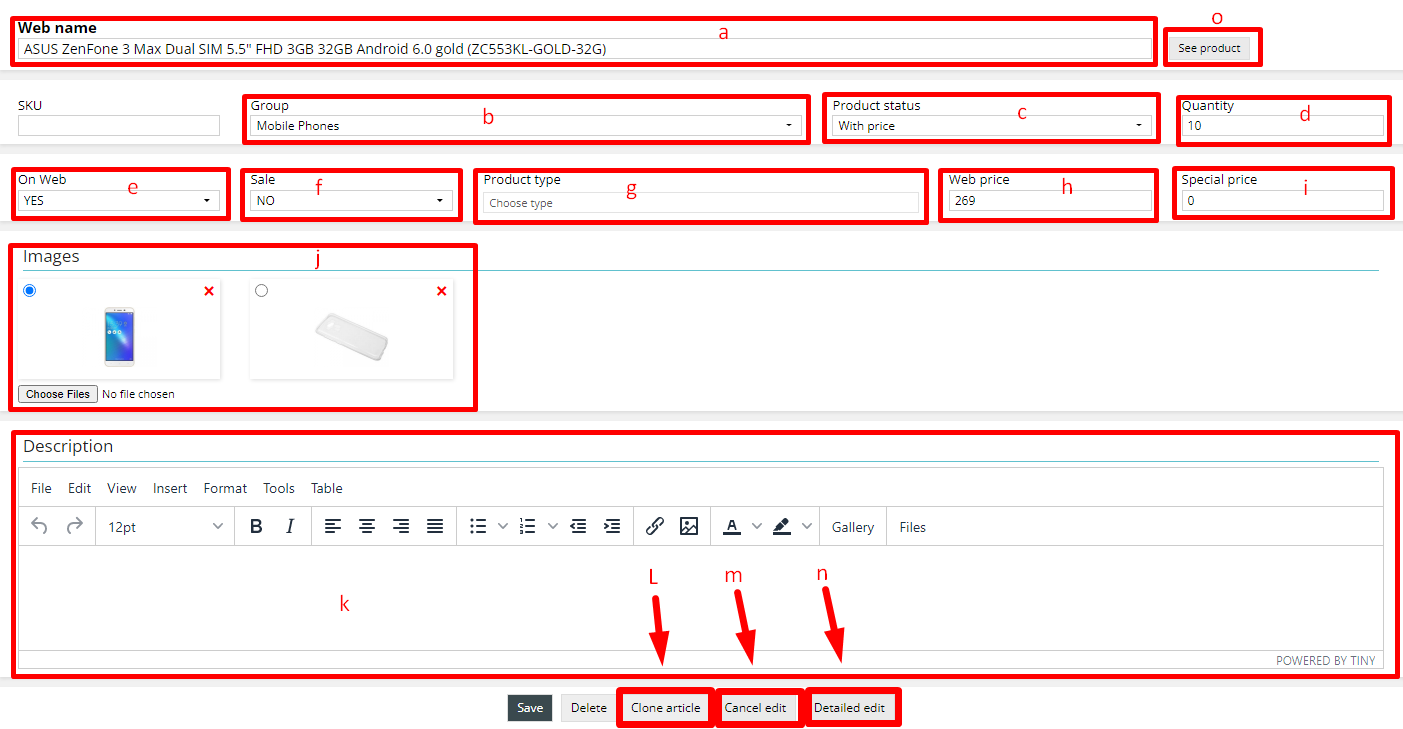
Product name (obligatory)
SKU (b)Product store keeping unit code
Group (c)In a drop-down menu we choose a group where a product, we create, will be. If a group is not assigned, it will be shown on home page, in section The newest products. You may register a group by entering a name into a field Group and save the changes. The Group is immediately formed under that name; for detailed group creation click on the menu Codebooks.
Product status (d)In a drop-down menu you choose status of product. By default, condition is - In stock, while the other condition may be added and named according to user wish.
Quantity (e)Here you enter quantity (stock) of products.
On Web (f)In a drop-down menu you choose options YES and NO. When Yes is chosen, products will be shown in a shop. When No is chosen, no product will be shown.
Sale (g)You choose options YES and NO in a drop-down menu. When YES is chosen, a product is on sale and additional options for a period of sale From -To will turn up. By clicking on a filed in a calendar you choose dates of sale. When a specified date passes, the product is automatically not on sale anymore. With option No, a product is manually removed from the sale.
Product type (h)In a drop-down menu you choose a type for selected product. Types are created on page Codebooks and in card Types. After assigning a type, a product will be listed on home page in that type.
Web price (i)Product web price (Direct entry possible without margin)
Special price(j)A field for special price entry will be shown only when Sale is active.
Images (k)By clicking on Select image, a folder opens. After saving a product changes, it is possible to load more images by repeating the procedure.
Description (l)A field for description entry will be shown on product page.
Clone product (m)By clicking on a button, a new product entry opens. Data in a new product are copied from the previous one.
Cancel edit (n)Cancellation of loaded changes.
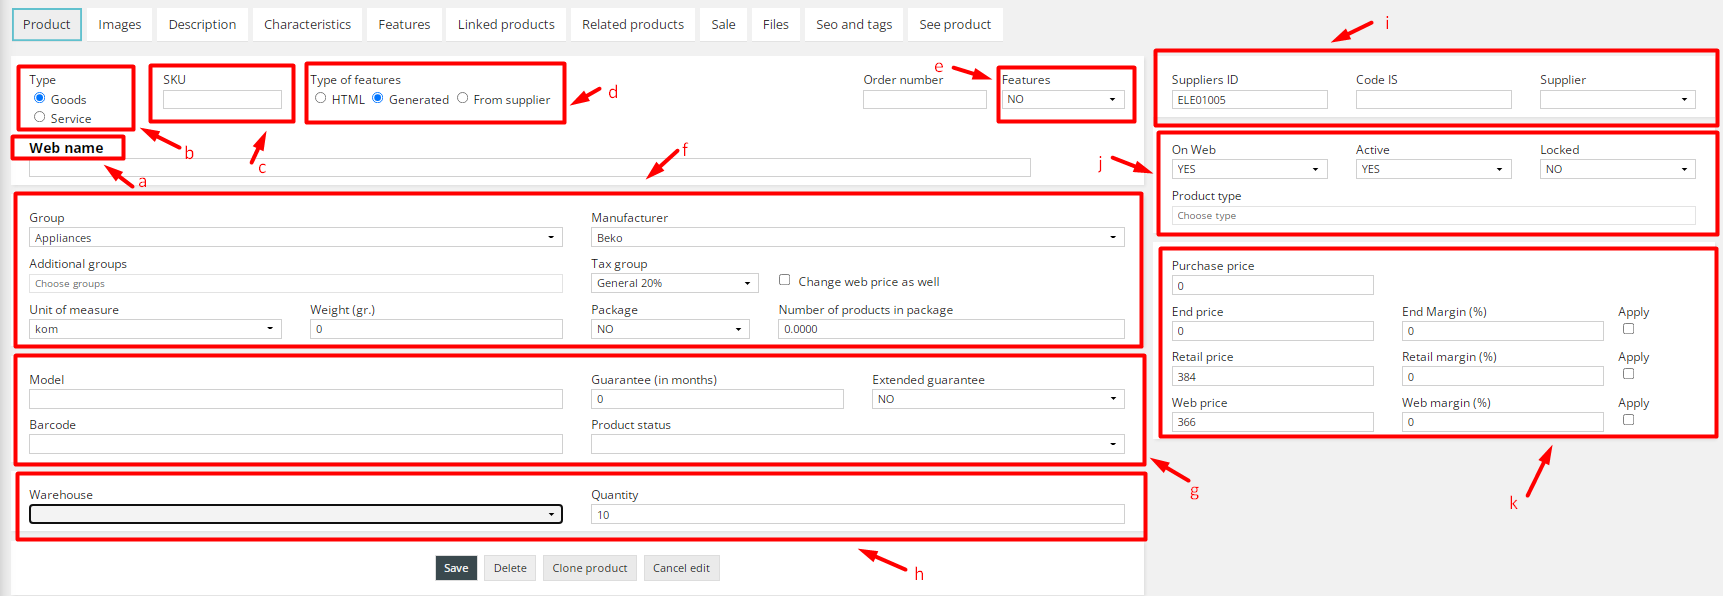
Product name (obligatory).
Type (b)Type of product, Goods or Service.
SKU (c)SKU (stock-keeping-unit) is a unique code that simplifies managing of products and stock. It may be used for identification of versions of products, production lines and services. SKU often refers to various versions of the same product. You can enter here your unique product code.
Type of characteristics (d)By choosing one of these types, characteristics will be shown on product page below a shop description.
Product administration (e)* Group - in a drop-down menu we assign a group in which product will be shown. If the group is not assigned, it will be shown on home page in a section The Latest Products. Group should be created on page Codebooks.
* Manufacturer - You can change the manufacturer by selecting the manufacturer in the drop-down menu.
* Package - Allows you to sell multiple units of the same product.
* Additional group - in a drop-down menu an additional group is selected in which a product will be shown.
* Tax group -in a drop-down menu tax rate is selected and is applied to web pricing. (There must be a procurement price). Tax rate is created on page codebooks and Tax rate card.
* Unit of measure - In a drop-down menu, this unit is selected. E.g. a piece, a kilo, meter, a liter. Unit of measure is created on page codebooks in a card Unit of measurement.
* Weight (in grams) -Here you enter product weight in grams. Weight can be used for shipping costs by weight. The weight from - to for shipping is defined on both page Codebooks and Shipping costs card.
Additional fields (f)* Model - Field for product model entry (not obligatory)
* Guarantee - Field for product guarantee entry (not obligatory)
* Barcode – Field for product barcode entry (not obligatory)
* Product status -It is chosen in a drop-down menu. By default state is With pricing, but if some other state is selected, then that state will be shown in letters instead of `Add to cart`.
Warehouse (g)* Warehouse - Selection of a warehouse in a drop-down menu. Warehouses may be: Central (by default), Retail warehouse, Service warehouse and Wholesale warehouse.
* Quantity - Field for product quantity entry (stock).
Supplier information (h) (an option visible only when import from supplier is enabled)* Supplier code - Field for supplier code.
* Supplier - Supplier name who supplies products.
Display on shop (i)* On Web - in a drop-down menu there are two options - Yes and No. By choosing Yes, product will be shown on a shop; while No- it will not be shown.
* Active - in a drop-down menu there are two options – Yes and No. By choosing Yes, product is active. If option is No, product has inactive status.
* Type of product - it is chosen in a drop-down menu. Types are created on a page Codebooks in a card types. When a type is assigned, a product will be listed on home page in that type.
Price updating (j)* Purchase price - Product procurement price
* Retail price -Product retail price (Direct entry without margins is possible).
* Retail margin (%) - Margin for Retail price is expressed in percentages. There is a button apply which calculates new Web margin.
* Web price -Product web price (Direct entry without margins is possible).
* • Web margin (%) - Margin for Web price expressed in percentages. There is a button apply which calculates new Web margin.
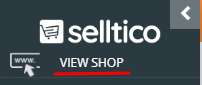
When you are logged in on admin panel by clicking View Shop you can see the homepage of your webshop.
On the top of the homepage there is a menu with the following options: `Products`, `Save changes`, `Admin panel` and `Sign out`.

Option Products serves for faster administration of your products and view without entering on admin panel.
Option `Save edit` serves to save changes.
Option `Admin panel` serves to go back to admin panel.
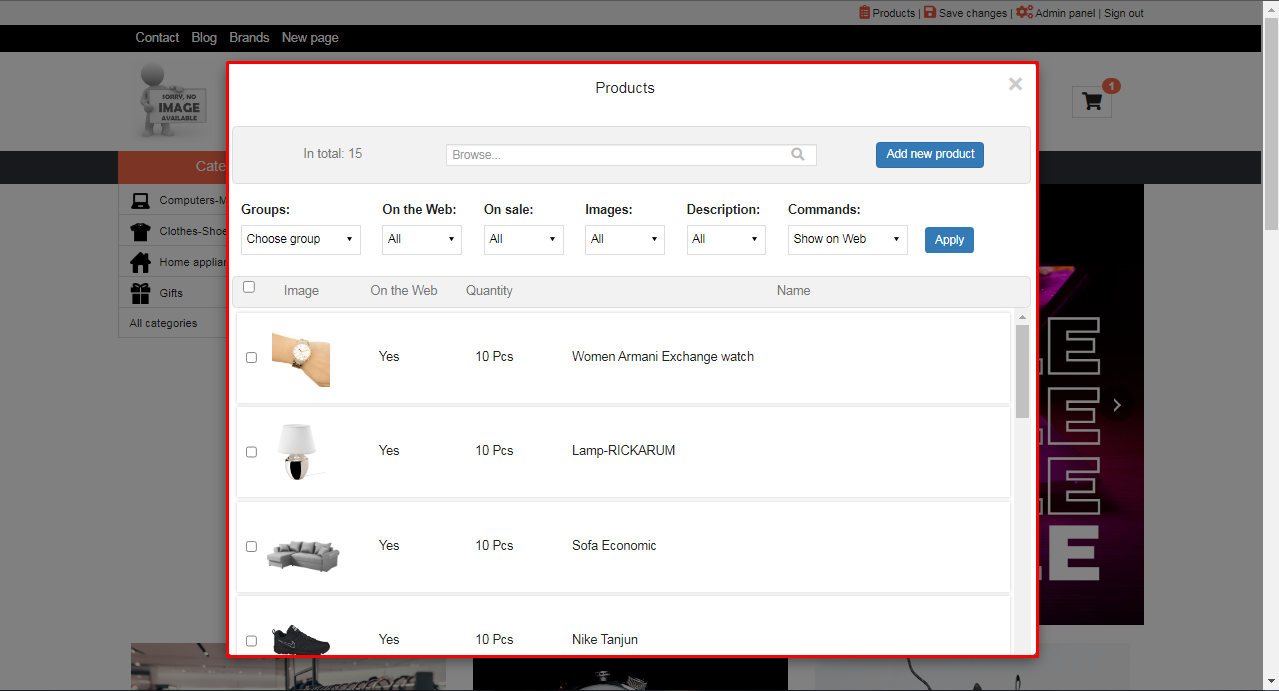
By clicking `Products` a window for view and product updating opens.
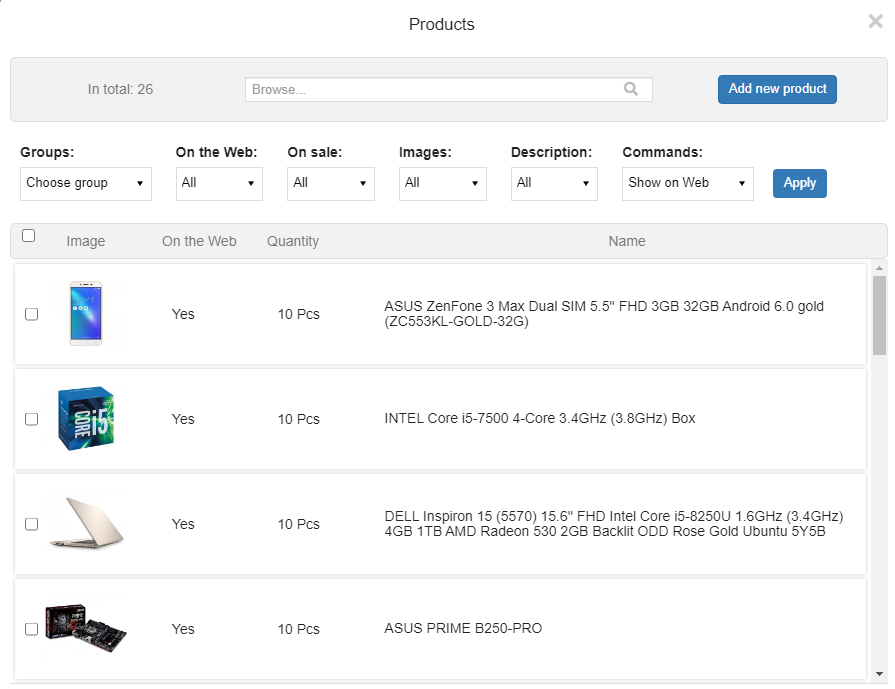
Information on total product number in a shop can be seen at the top of the window; browse field by product name as well as a button `Add new product`.
Option line below serves for sorting and selecting products in the list.
Option `Groups` serves for product listing of a certain group,
Option `On the Web` serves for view of products which are visible or not visible in your shop.
Option `On sale` displays or does not display products on sale.
Option `Images` serves for checking which products were and which were not assigned an image.
Option `Description` displays which products have and which does not have description.
Option `Commands` carries out the commands for selected products in the list. `Put on Web` puts products in a shop; `Remove from Web` - removes products from the shop; an option `Put on sale` - puts products on sale; `Remove from sale` removes them from sale; and `Delete` - deletes all the selected products in the list.
A square for marking serves to mark all products in the list and apply some of the commands.
New product entry is done by clicking on `Add new product`.
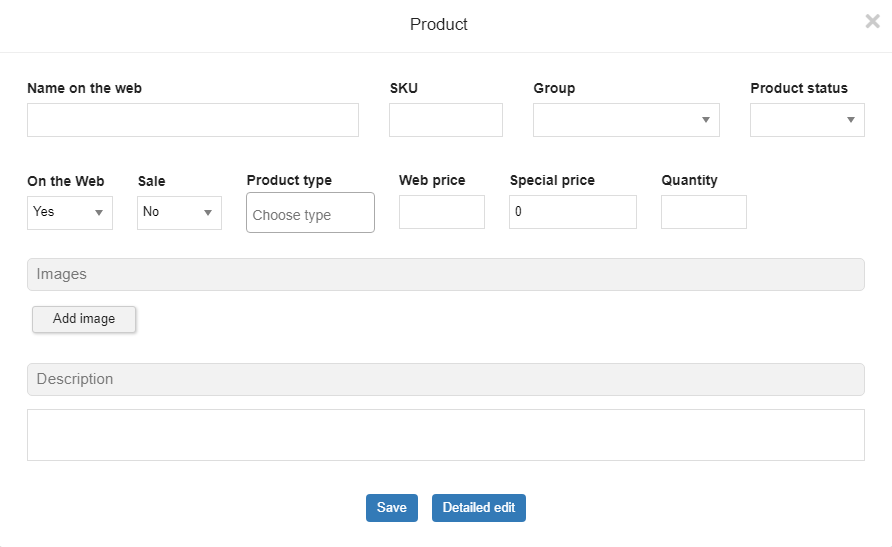
A form for data entry about product opens:
In the field ` Name on the Web` you enter a name of a product, then, if you wish, you add your product code in the following field `SKU’. From a drop-down menu you choose a group this product belongs to. If it does not exist, you may form a group directly from this field by entering a name of a new group. `Product status` serves to send an adequate message instead of adding a product into a cart. This is convenient if you do not have a product in stock at the moment, but it will be soon available. You may also enter `State of product` directly into a field if there is no adequate ones.
`On Web`, as its name indicates, serves for your product to be visible in the shop.
If in option `Sale` you choose YES, date fields for entering the duration of sale are shown. If you specify the duration of the sale, the product will be automatically removed from the sale after the expiration date.
In a field `Web price` you enter a sale price of your product. If you select that product is on sale, you also enter a price into a field `Special price `which will be visible together with `Web price` and the discount will be shown.
If you check stock, in a field `Quantity` enter a number of products in stock.
By clicking on `Add image` you can add images; you find an image in your computer and load it. Red taster X deletes an image.
There is a possibility of entering product description in a text editor.
By clicking on `Save`, the whole loaded product content is saved.

`Delete product` - you delete product and all information including images. ` More detailed edit` leads to a part of admin panel where you can edit a product as it is described in the video ` Manual for product entry`.
`Detailed edit` leads to a part of admin panel where you can edit a product.
` View product` leads to the display of product in a shop.

After the initial creation of a new product, new options are listed.
ImagesBy clicking a card Images a new page opens where you enter an image for product. In order to enter an image, click Add image. By clicking Choose an image, a folder on your computer opens. Select an image and click Save. For another image, repeat the procedure.
DescriptionOn a card Description you add or edit product description. The description supports HTML. There is an option of pattern entry which is created on page Codebooks and on card Group.
CharacteristicsProduct characteristics are entered on card Characteristics.
HTML characteristicsData in HTML format are entered in a field on page HTML characteristics.
Generated characteristicsGenerated characteristics are related to groups and are created on page Groups separately for each group.
CharacteristicsCharacteristics are copied from a supplier through Web Import.
FeaturesFeatures of a product are assigned (color, size, etc.) in this submenu. Features are created on page Codebooks and card Features.
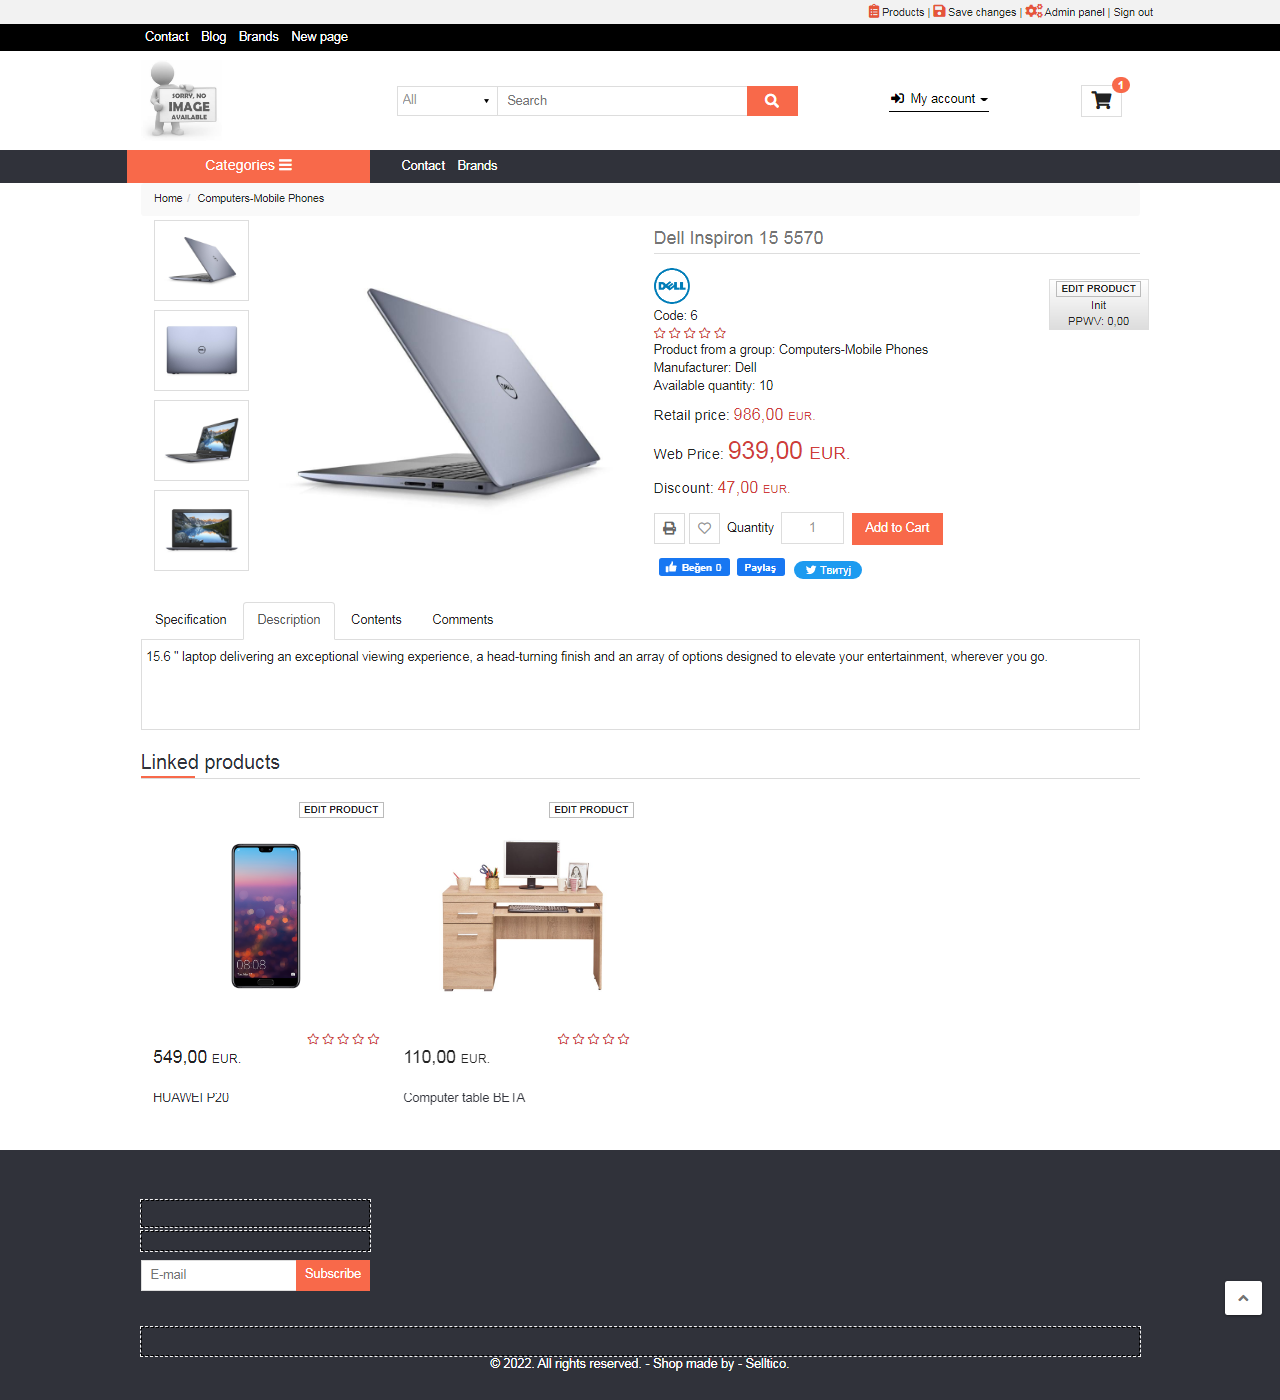
Linked productsLinked products refers to choosing the main product and adding other products that will be related to the main one. You can link product which is recommended together with the basic product. To add new linked products you may enter in blank field: product ID, name of product or manufacturer, or the most specific group. Linked products are shown under the descriptions and characteristics on the product page in your shop.
Related productsRelated products can be linked and showed as similar products to the main one.
SaleSale By clicking a tab Sale you can a product on sale. Sale is temporarily limited and it is canceled automatically after the expiration date.
FilesThis option enables you to enter documents concerning products such as technical instructions, certificates and other. You can enter documents or links for your product. The file will be shown below the product images in a card Technical documentation.
SEO and tagsHere you enter SEO title (75 characters), SEO description (160 characters), key word (160 characters) and tags (separated by commas). When you finish with entering of the content, click on save.
SEO (Search engine optimization) of web-site for browsers is a process to enhance both quality and quantity of traffic from a browser to web-site through natural (organic or algorithmic) search results. The better the site is positioned (e.g. in browsing it comes among the first on the list), the more traffic will be diverted from a browser engine to it. SEO can do various types of browsing including image browsing, local browsing and other.
View productBy clicking on See product you come to a shop page where product details are and which you are currently updating. If you click on Edit product you return to the administration of that product.
On this page there are information about a customer and partners. Customer may be individual or legal entity while partners may be wholesale customers or suppliers.


There is a possibility to comparatively filter a customer by individuals and legal entities with registered and unregistered customers.
Information about customer (c)There is a display of basic information about a customer in a table, such as: name of a customer, address, place, e-mail and telephone number.
Search (d)It is done by both name and the last name of a customer.
Edit customer (e)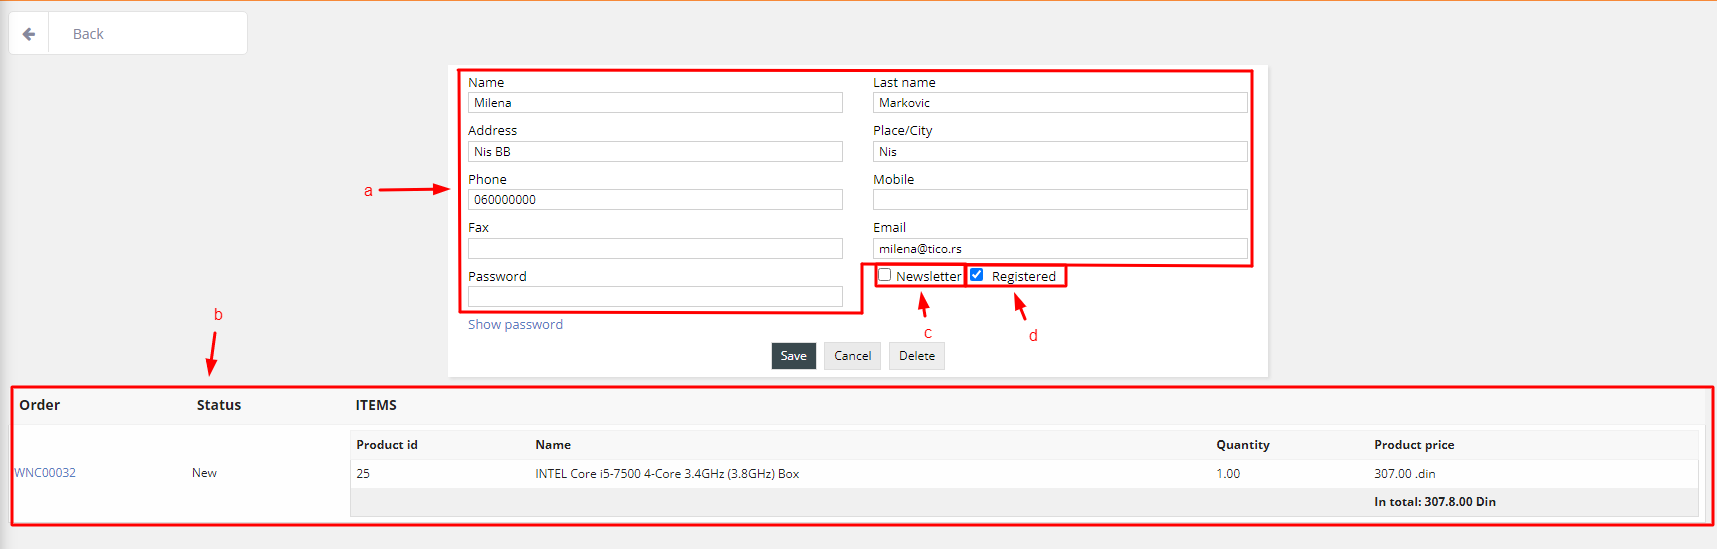
Deletes all information on a customer; if a customer has a history of ordering, a warning shows up and alerts you. If you still want to delete a customer, you will also lose an analytics of ordering.
Newsletter (g)By clicking on Newsletter you get export of the clients e-mail addresses who applied for receiving newsletter.

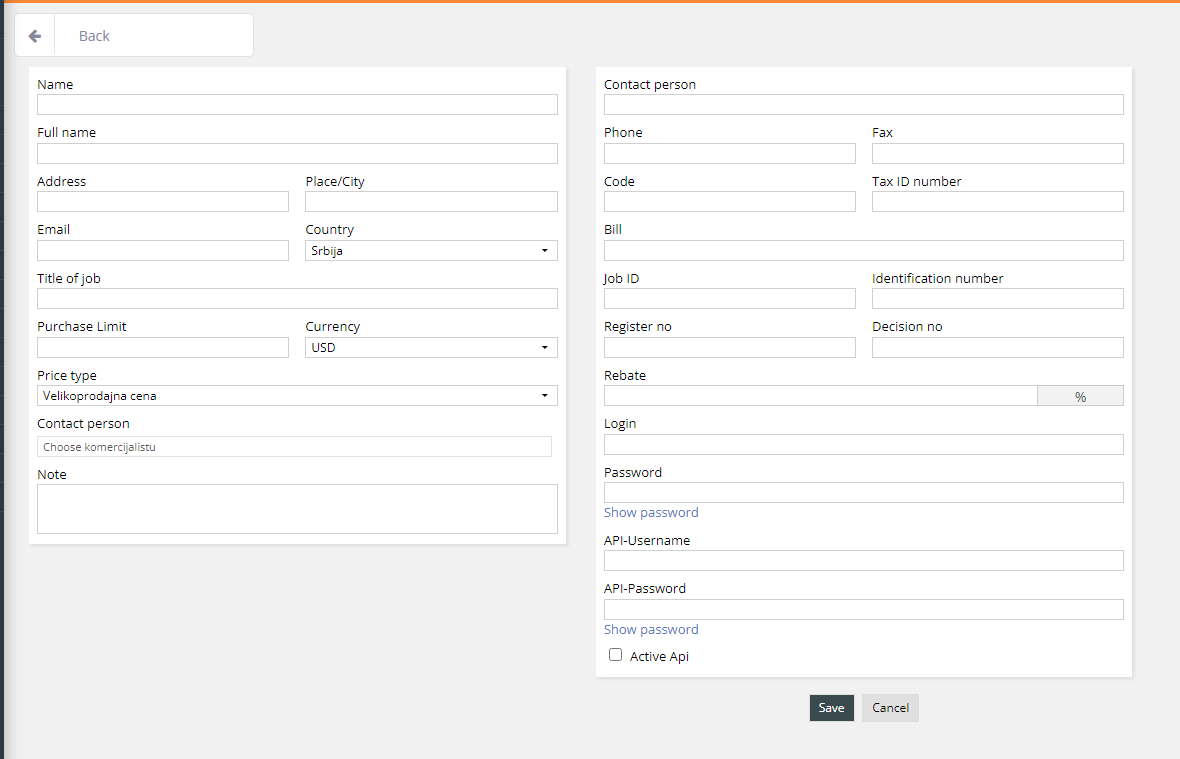
Obligatory fields for a partner are: name, address, place, city and firm ID number.
Browsing (b)It is done by name, address and place.
Partner information (c)In a table you have a display of basic partner information, such as: name of a partner, address, place, e-mail and a telephone number.
Edit (d)You can edit a partner's information.
Delete (e)Delete all partner information.
Export (f)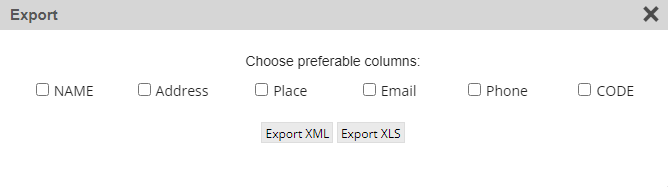
Here you have a possibility to export selected partner information. An export can be either in XML or XLS format.
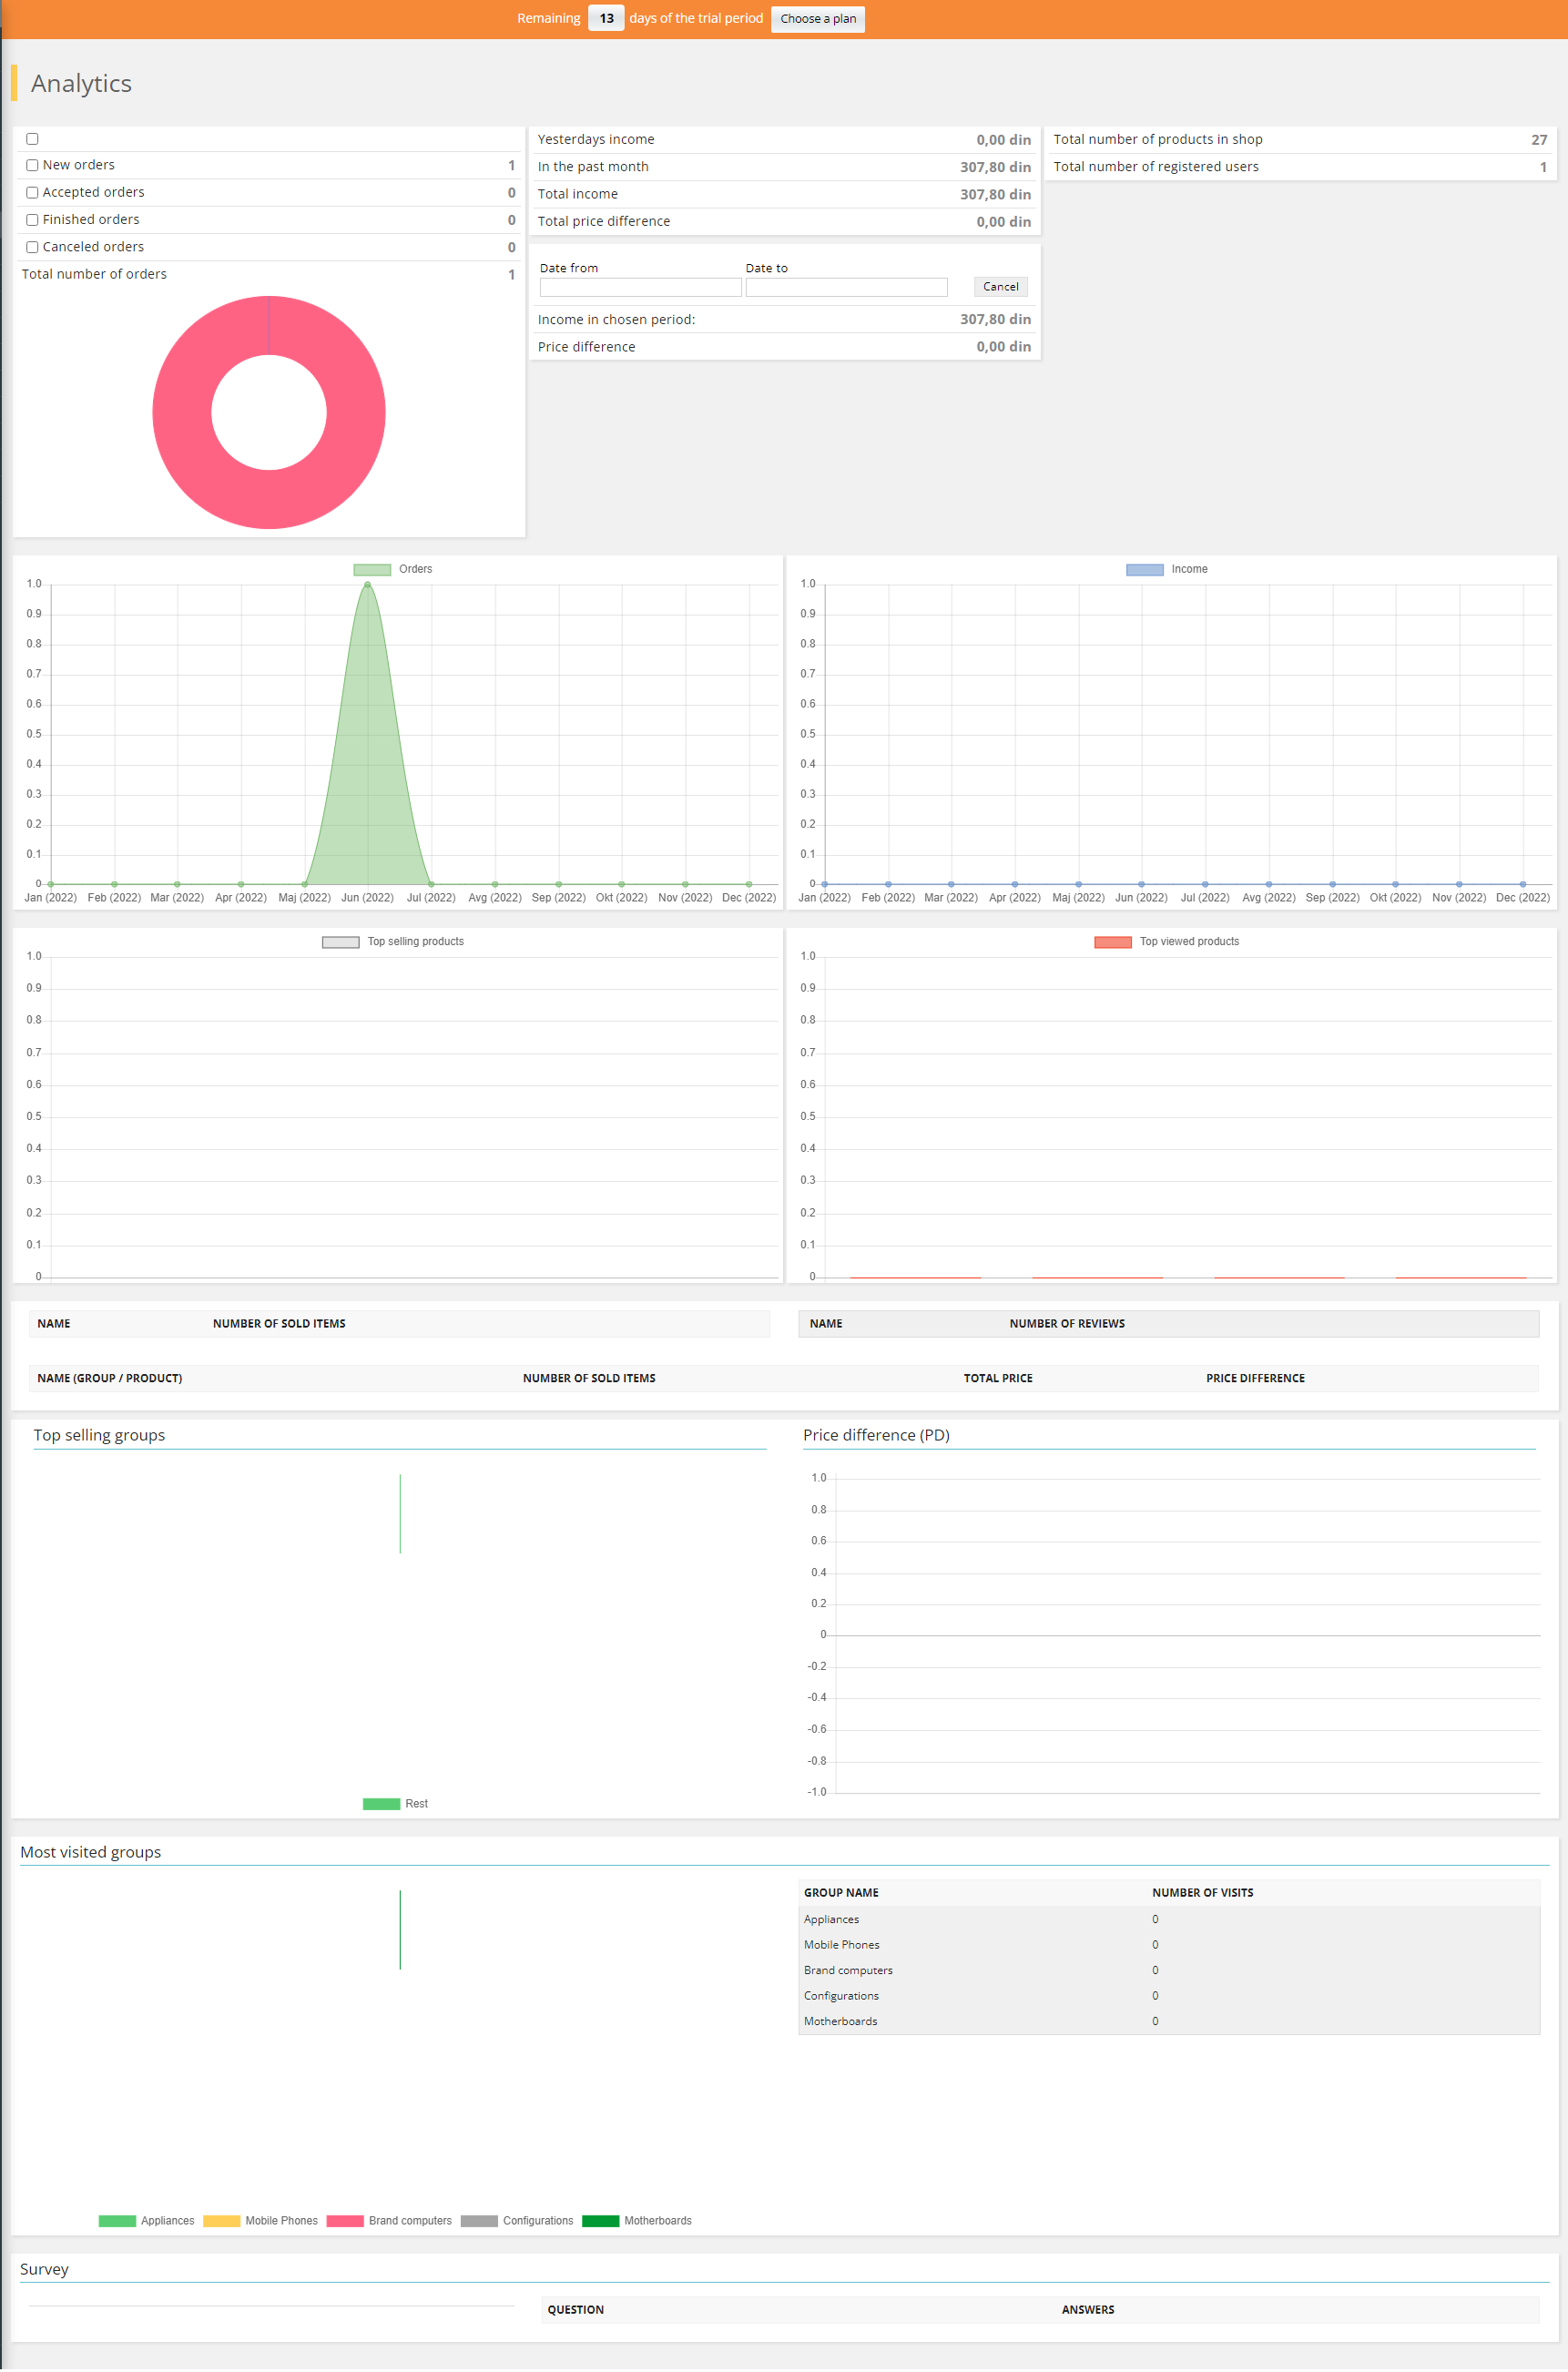
Here you can have an insight into the analytics:
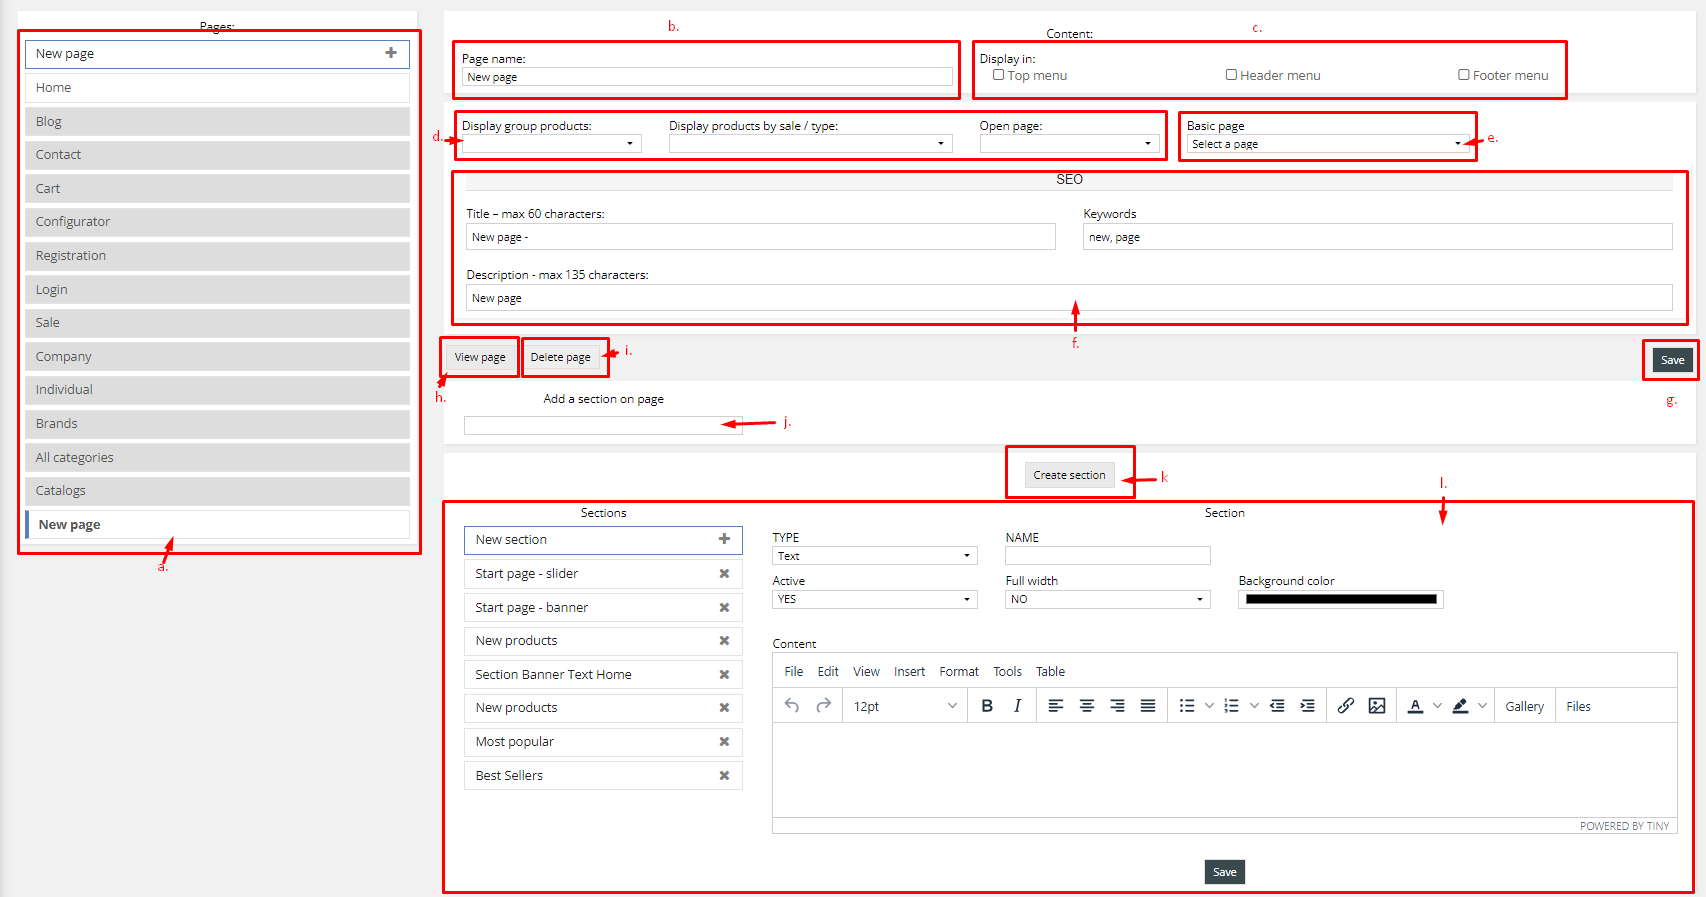
On this page you do the page administration shown in a shop:
On card Pages you can:
- create a new page by clicking a button New page.
- if you select an existing page you can change the content.
- the order of pages is changed when by a left click you select a page and drag it to a place you wish. Pages are listed at the top of your shop.
In this field you enter a page name which will be shown in your shop (obligatory).
Page display (c)With this option you choose where your page will be shown. The following options are at your disposal:
Top menu – at the top of the shop;
Header – usually next to a category;
You use this option on a new page that you create. If you don’t want to use sections and build page block by block, You can display products of the specific group, sale type or product type. Groups,
Main page selection (e)In a drop-down menu, you select a page below which you can browse a page you create. For the main page to be shown before that, a display in the Header menu must be selected.
- Addition of the sub - page
Click on a page which should be in a drop-down menu, select a home page below which that page will be shown, and then, click Save.

Data entry for SEO title, description and keywords.
Save page (g)You enter textual or HTML content shown on this page.
View page (h)By clicking on View page, you can see the display of a page you are editing.
Delete page (i)By clicking on Delete page, you can delete the selected page.
Section order (j)When the sections are created, you can determine the display order of sections on the pages by drag and drop. If you don’t have any sections created yet, You need to create them
Create section (k)You can see this button, when you choose the name of the new page and click Save. Then you can click on this button to create or edit sections and the Section editor will appear.
Section editor (j)In the section editor you can create and edit Text, Slider/Banner, Product list, News list, and Newsletter section. You create a new section by clicking on New section.
After you have clicked on Create section and New section button you can choose the type of the section. Text type is chosen by default.
Here you have:
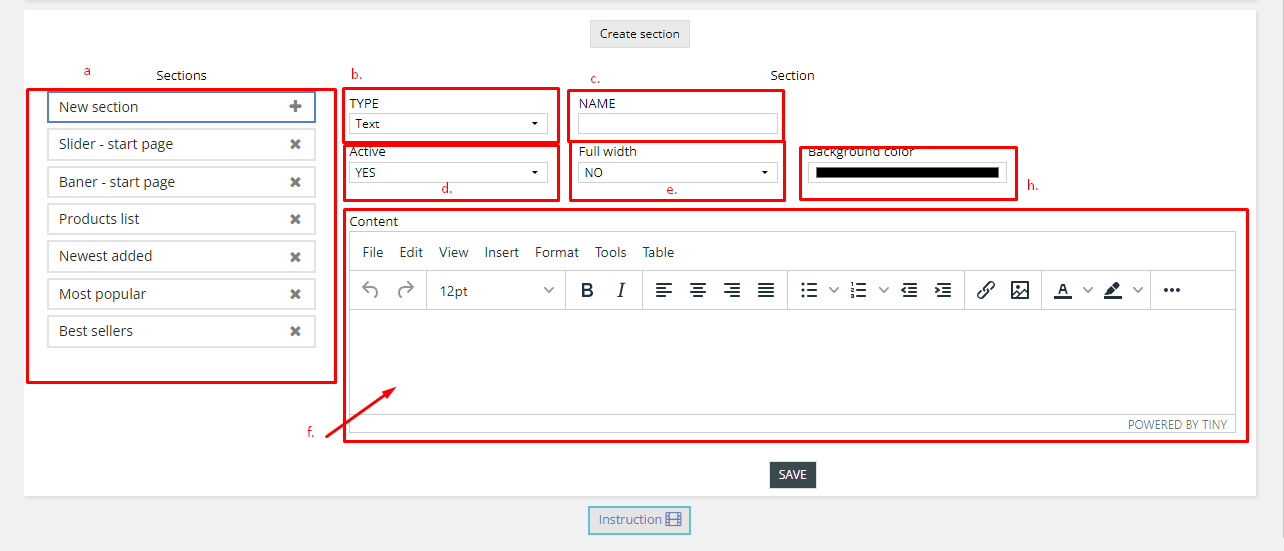
On the right side, You have a list of all sections available for edit and the button for new section.
Type of section selection (b)There are Text, Slider/Banner, Product list, News list, and Newsletter sections to choose from.
Name of the section (c)Name of the section is obligatory field.
Display activation (d)You can choose Active YES for the section to be visible on the webshop, or NO if you don’t want to display it but you don’t want to delete it either.
Full width option (e)When YES is selected the section will be display without margins, end to end, left and right. If you choose NO there will margins on both sides.
Content editor (f)Content editor is available only in text type section. You can enter and format text, pictures, videos, tables and a lot more in this text editor.
Background color (h)If you wish you can change the background color of any section. For the text section for example, you need to enter the name of the section, then you make sure it’s active, and after that you can enter the text and add images by drag and drop. When you are done, click on the save button and then your section will be created.
For the text section for example, you need to enter the name of the section, then you make sure it’s active, and after that you can enter the text and add images by drag and drop. When you are done, click on the save button and then your section will be created.
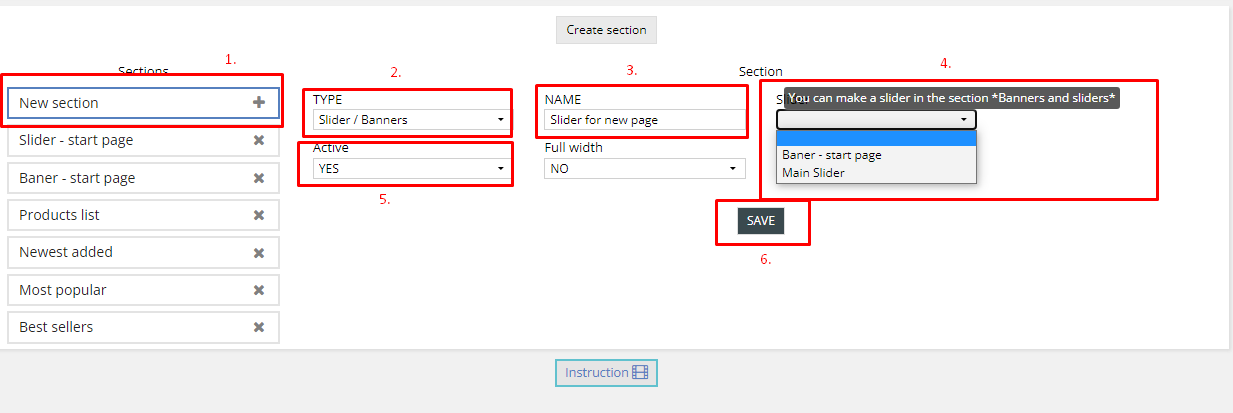
To create new slider/banner section you will need to create slider and banner in the Banners and sliders menu. If you have already created sliders or banners, you can follow these steps to create new section:
After you have saved the section, you need to add it to the pages via the drop down menu Add a section on page.


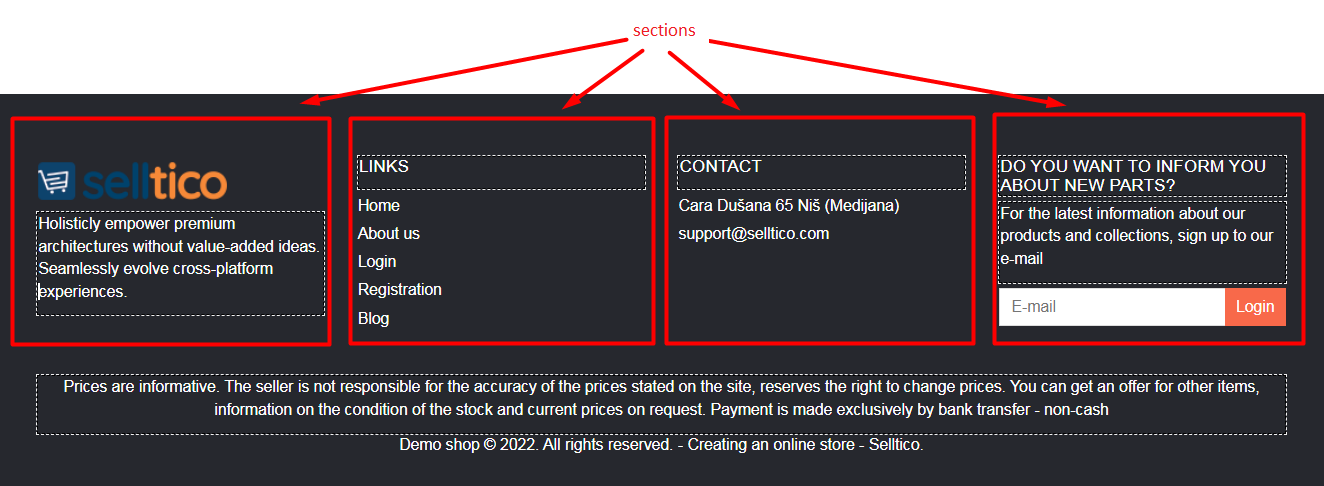
On page Footer you have a possibility of administrating it. Footer is visible at the bottom of your webshop. On the left there are Sections while on the right there is the content of the Section. Section is created by clicking on the button New section. Footer is located at the bottom of your internet store. It comprises of the sections you create yourself. The sections are divided by types. A type depends if a text, image or link is entered to a certain page in the section you had already created. There is also a Contact type. It displays your previously entered contact information for the store. The Social Networks type displays previously entered links in the Contact menu in the Social Networks section. A new section is created by clicking on a New Section button. In the field – Title, enter the title of the section while the type of section is selected from a drop-down menu – Type. You choose if the new section is active or not in the section- Active- from a drop=down menu. The sections are displayed in the order they are entered and if there are more than 4, they are diplayed in the following row. The order of the sections can be changed by selecting and dragging of the section to the desired position.
Example No 1: Logo entry of your shop
If you wish to enter your logo and a text about your shop, you do the following:
Click on the New section
In a field Title enter: Logo
From a drop-down menu Type choose: Image
From a drop-down menu Active section choose: YES
In textual field - content enter the text you want.
At the bottom of the page click on Add image and choose an image of your logo from your computer or enter link to the image. By clicking on Save you load the image. If you wish for your Logo section to be the first on the left side, it is necessary to move it to the top of the sections.
Example No 2: Creating sections with links (from the previously created pages)
Click on New section
In a field Title enter, e.g. – Our links
From a drop-down menu Type choose: Link
From a drop-down menu Active section choose: YES
Below Title a drop-down menu opens where you can find the previously defined pages.
Choose pages which should be in section and click on Save. They are listed in a part Section.
You can change the order of section by selecting and dragging section to a position you want.
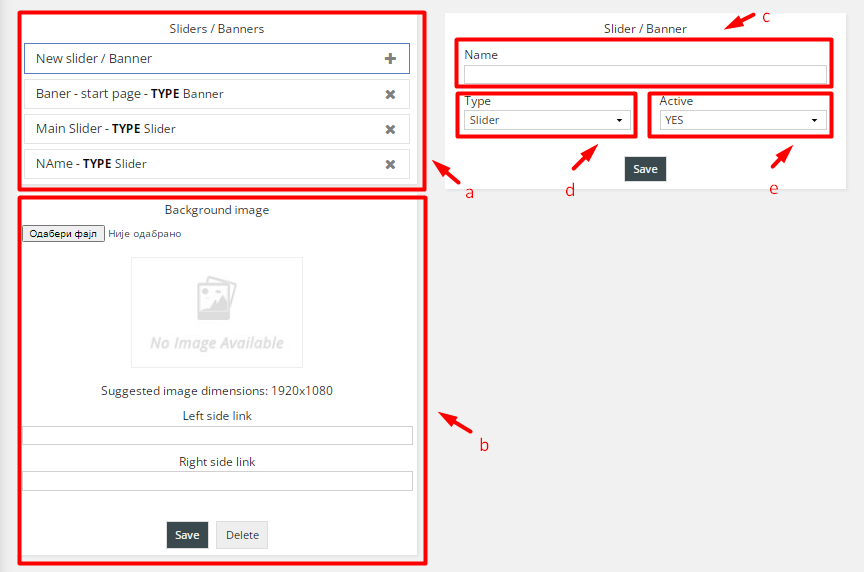
On this page you do the administration of the banners, sliders, popup banners and a background image shown on the home page of your shop. You can see the following:
Here you do the administration of a banner and a slider:
- Banner creation and slider; (by clicking on new banner or new slide)
- Change of existing banners and slides;
- Order change of banners and sliders. (You change the order when with a left click you select a banner or a slider and drag it to the place you want).
Enter an image for the background of your webshop. There is a possibility to link both the left and right sides of the background image. Enter a link you want into a field. Recommended dimension for a background image is 1920x1080 pixels.
Name of banner or slider (c)In this field enter the title of a banner or a slider (obligatory)
Type of slider or banner (d)From the drop-down menu choose any options from the following: Slider, Banner, Pop-up banner, Text banner, Gallery banner, Text Banner (text left), Slider Gallery, Text Banner (text right).
Display activation (e)Choose active YES if you want the slider or banner type to be visible on the webshop.
Adding imagesAfter you have selected the type and name of the slider or banner and clicked Save, the image input fields will appear:
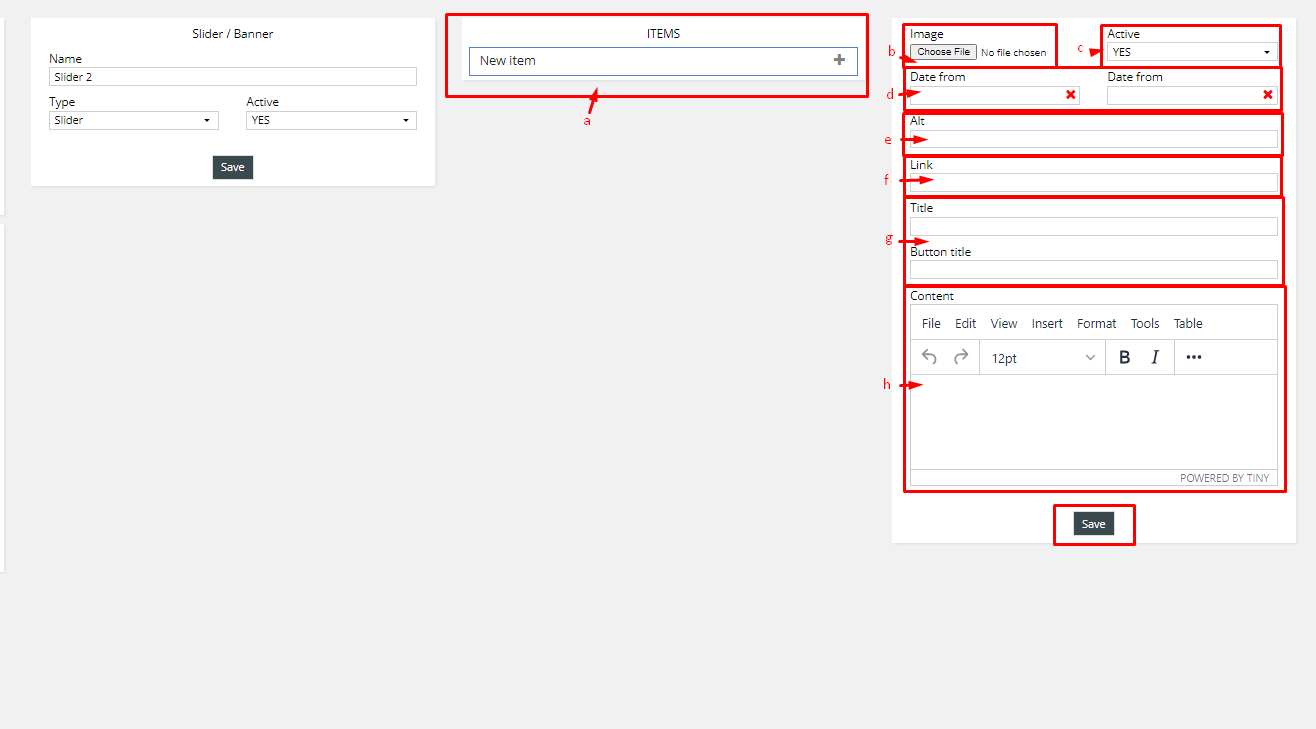
For every new image you want to add to your slider, click on the New item button.
Add image (b)Click on Add image opens a folder on your computer and choose an image you want. When you choose an image, click on Save.
Display activation (c)In a drop-down menu you choose options YES or NO. When Yes is chosen, a slider or a banner will be shown on your page, while if No, a slider or a banner will not be shown.
Duration of banners or sliders (d)You choose a date from when to when your banner or slider will be visible on site. When a certain period expires, they will not be on site.
Alt text for a photo (e)In this field, you can enter the alt text for search engines.
Link for banner or slider (f)You enter a link you want (clicking on a banner or a slider takes you to the previously set link.
Title and button text (g)You can enter the button and title text for sliders in this field.
Banners and sliders content (h)Contents you enter will be shown through an image posted for a banner or a slider.
After you have saved the slider or banner, you can display it on the webshop through sections of the slider banner type. Here
Pop-up bannerPopup banner shows up on a home page when a customer visits your online shop. You can activate it by clicking on Type Pop-up banner and then choose a photo and the duration of the display.

On this page you create news that will be shown in the shop.
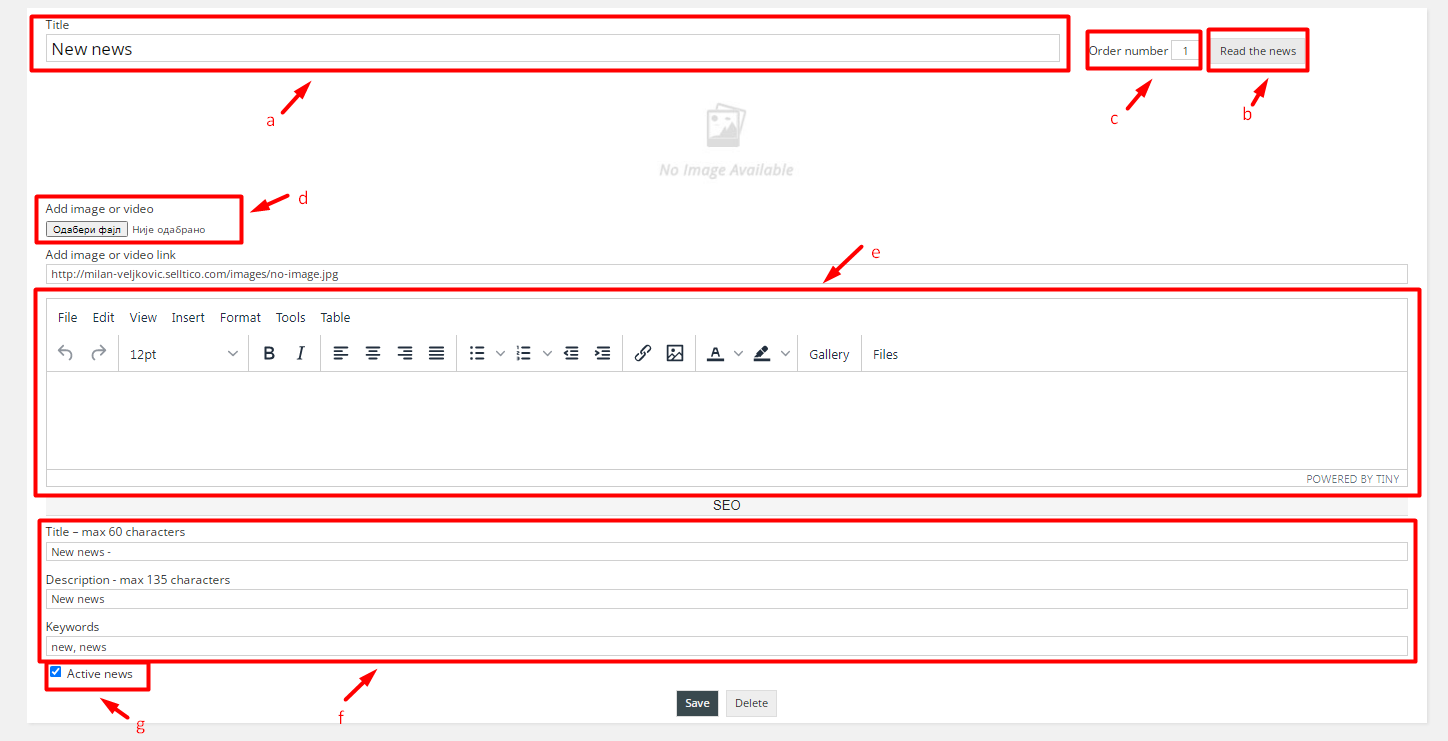
Click on Add new opens a page where contents of the latest news are loaded in.
Title (a)Field to enter titles of news.
See the news (b)A button to browse news in the shop.
Serial number (c)A field to enter a serial number; this number determines the position of the news. 1 means that that news is shown first, 2 the second, and so on;
Add image (d)Adding an image from the computer; This is the main image for the news being created.
Text editor (e)Here you enter news content you want.
SEO optimization (f)Fields for: SEO title; of Description and Key words.
Active news (g)Field for activating and deactivating the news.
Filtering news based on activity status.
Table with news
- Headline;
- News status (active, not active);
- Date of creation.
By moving a mouse over one of the news, the following shortcuts are activated:
- See- Particular news view in the shop.
- Edit- Content edit of the concrete news.
- Delete- Delete news

Comments administration is done on page Comments.
- Name – Commentator name;
- Comment – Text;
- Product – Product which is commented on;
- Status – New or approved
- More detailed – Product administration
A new comment notification is shown next to the card in a menu on the left side of the admin panel after a new comment was posted.
More detailed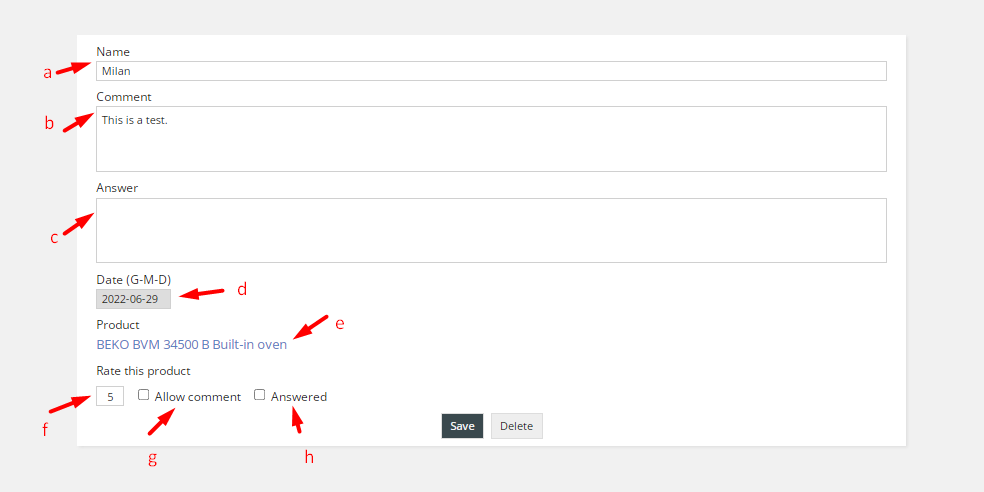
By clicking on More detailed you can administrate comments:
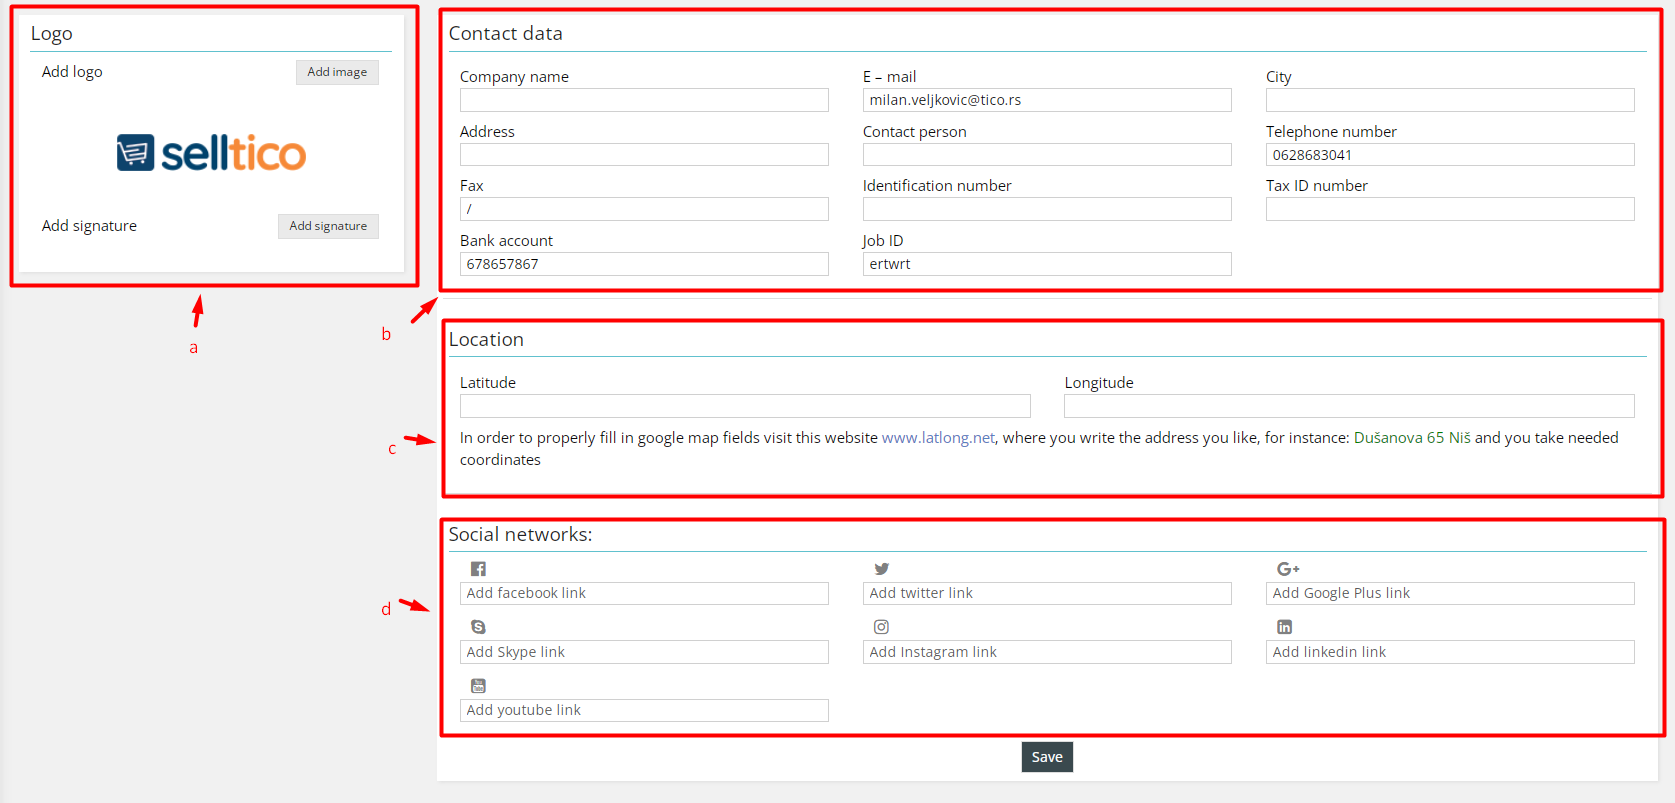
This page serves for shop identification.
You can upload the shop logo image here, and it will be shown in a header and on the invoices. You can use the signature to sign the invoices if needed. To add your signature click on Add signature and select the photo from your device.
Contact data (b)Here you can enter contact data which will be shown on page Contact and in documentation; obligatory fields are: Company name, Address, E-mail address, Telephone number, City, and Tax ID number.
Coordinates (c)Google map coordinates are entered in the fields. To fill in the fields correctly, you may visit this site www.latlong.net ,where an address you want is filled in. The necessary coordinates are also taken. The map is shown on page Contact.
Social networks (d)Fields for entry of links by pages/orders on social networks.

On page Users, you can adjust the access for the admin panel. There are three cards: Administration users – you enter a new user here or change access of the existing user for the admin panel of the shop. Also, a level of access can be applied and modules that a particular user can see (e.g. a business administrator, a warehouse clerk) and in the submenu Logs you can see and search log activity.
Administration usersCard of the Administration users contains:
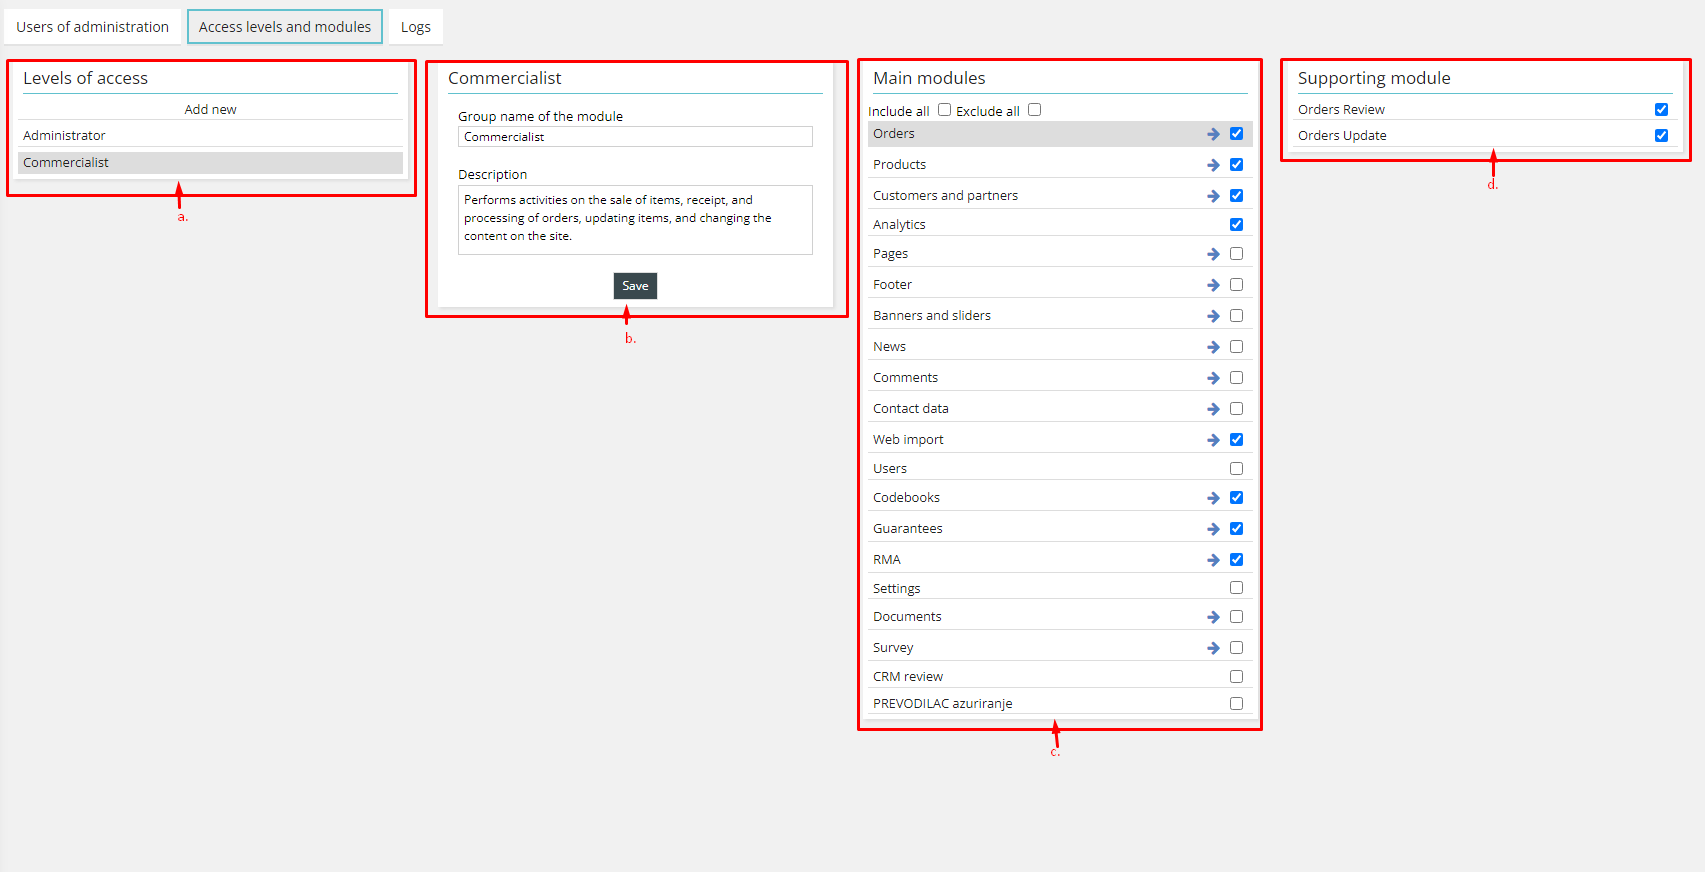
On this card there are:
Logs
In this submenu, you can search for activities in the admin panel and filter them by date, log time, users and actions.

The following cards can be found on the page Codebooks:
Groups, Manufacturers, Types, Units of measure, Tax rates, State of product, Order status, Configurations, Comments, Features, Payment method, Shipping method, Delivery costs, Carrier, Exchange rate entry, Catalog, Survey
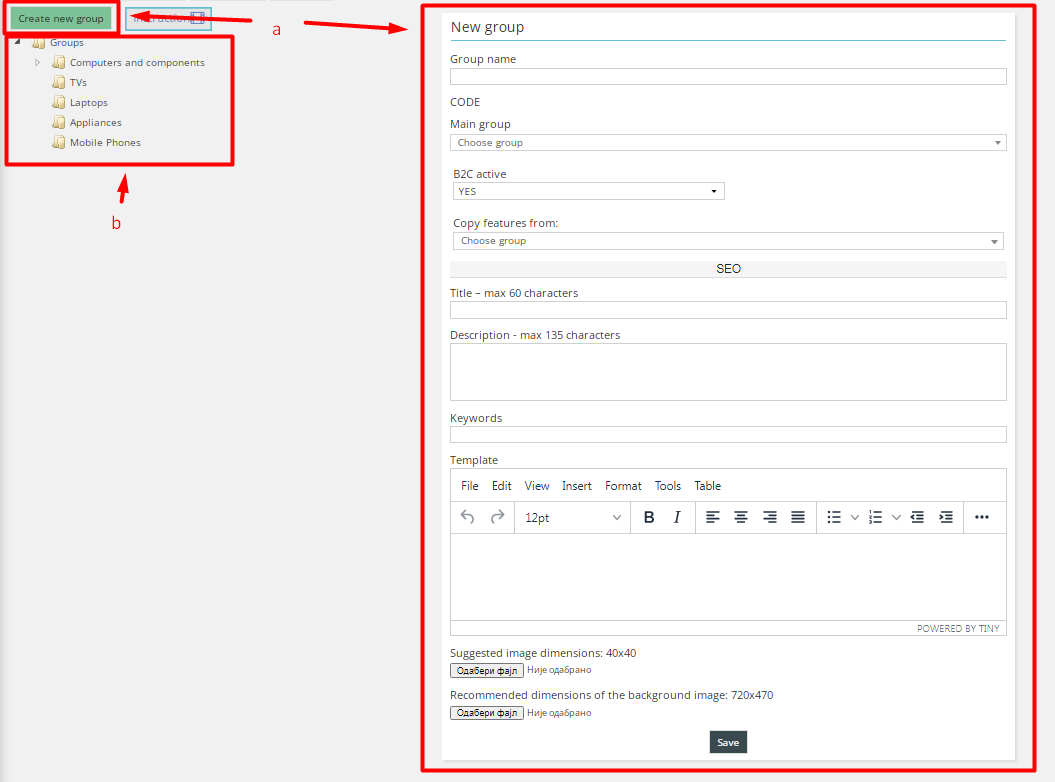
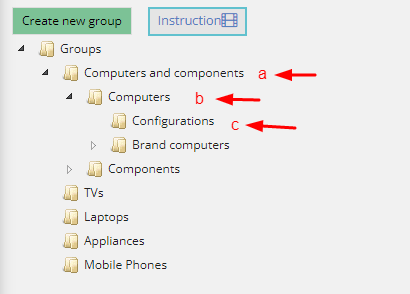
a. Creation of new group;
b. Groups menu;
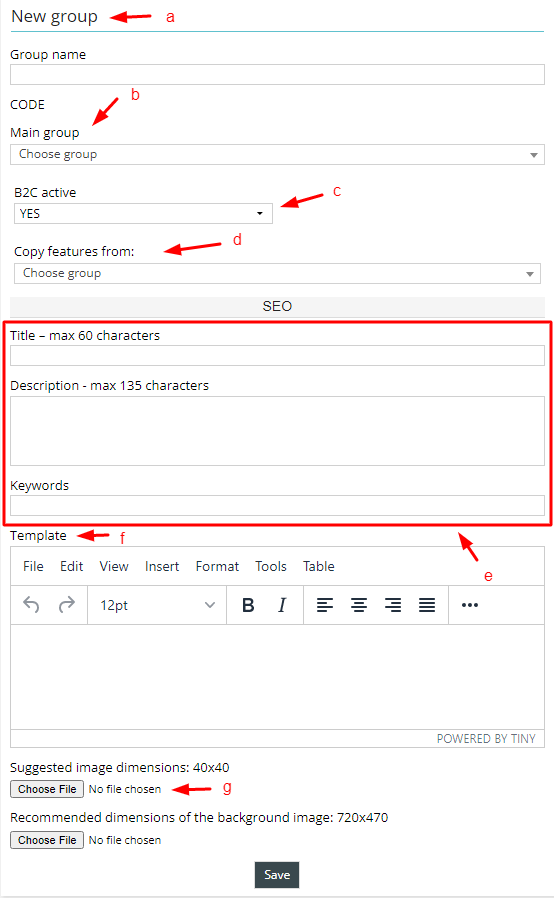
By filling in the form you create a new group
An example of a filled in form for a group – Computers and components:
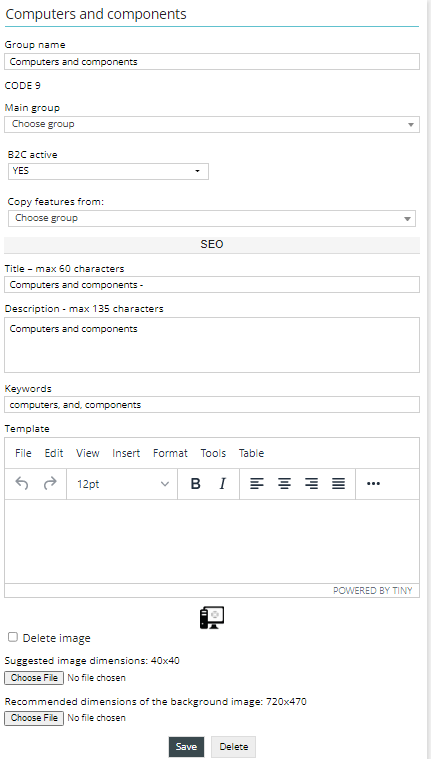
After forming the group, on the right side of the form, a card opens where characteristics are created.
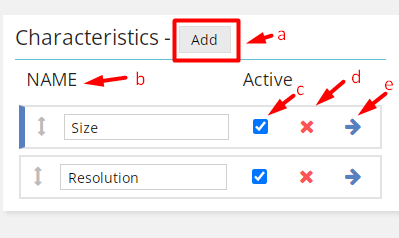
You can save the characteristic by clicking on enter button on your keyboard.
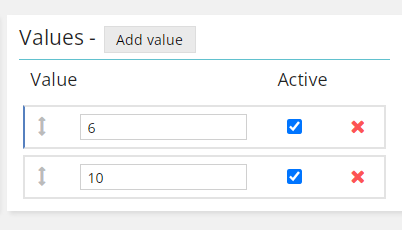
The procedure of adding value is similar to the procedure of the adding the Name of the characteristic.
Menu of the group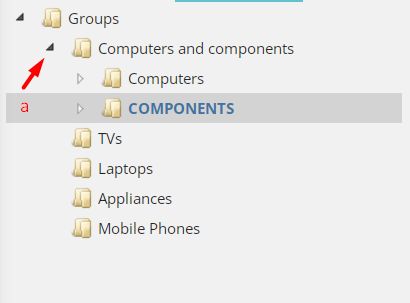
Menu of the group has the following possibilities:
View of the group, selection of groups for change, and schedule change of the main groups.
Change of order is done by selecting one group and drags it to a place you want.
a) Indicator of dragging; serves for easier selection of a new position of a group;
b) Chosen group and indicator of possibilities to choose a position.
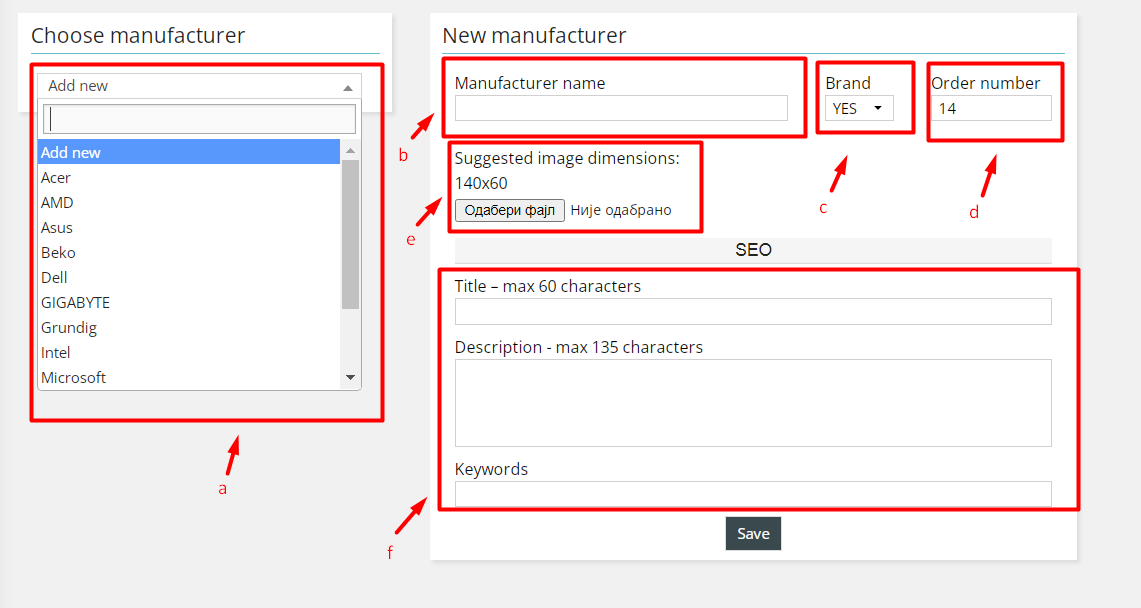
In a drop-down menu, click on the Add new to create a new manufacturer. By choosing the existing manufacturers you may change already existing ones.
Manufacturer name (b)The name in a field is entered, or the name of the existing one is changed. This field is obligatory
Brand (c)In a drop-down menu, you choose if a manufacturer is a Brand or not. If YES is chosen, a manufacturer will be shown on page Brands.
Order number (d)Determines the order number display of manufacturers on page brands.
Manufacturer image (e)You can upload a manufacturer photo from your device. Recommended image dimensions is 140x60.
SEO Optimization (f)The fields for SEO page title, meta description and keywords.

In a drop-down menu Add new is chosen to create a new type. By choosing the existing types, a possibility of their changing is obtained.
Type name (b)In a field, you enter a type or you change the existing type. This field is obligatory.
Active, Display at (c)(d)If active YES is chosen in a drop-down menu, then the type will be visible both in the shop and in the administration. If NO is chosen, it will not be shown anywhere. You can also choose if you want to use selected type on B2B, B2C or combined.
Order number (d)The order number determines the order of product type displayed on the home page. Products having assigned Type will be shown on the home page, e.g. (Our recommendation, Summer sale…). Types can be shown on a special page also.
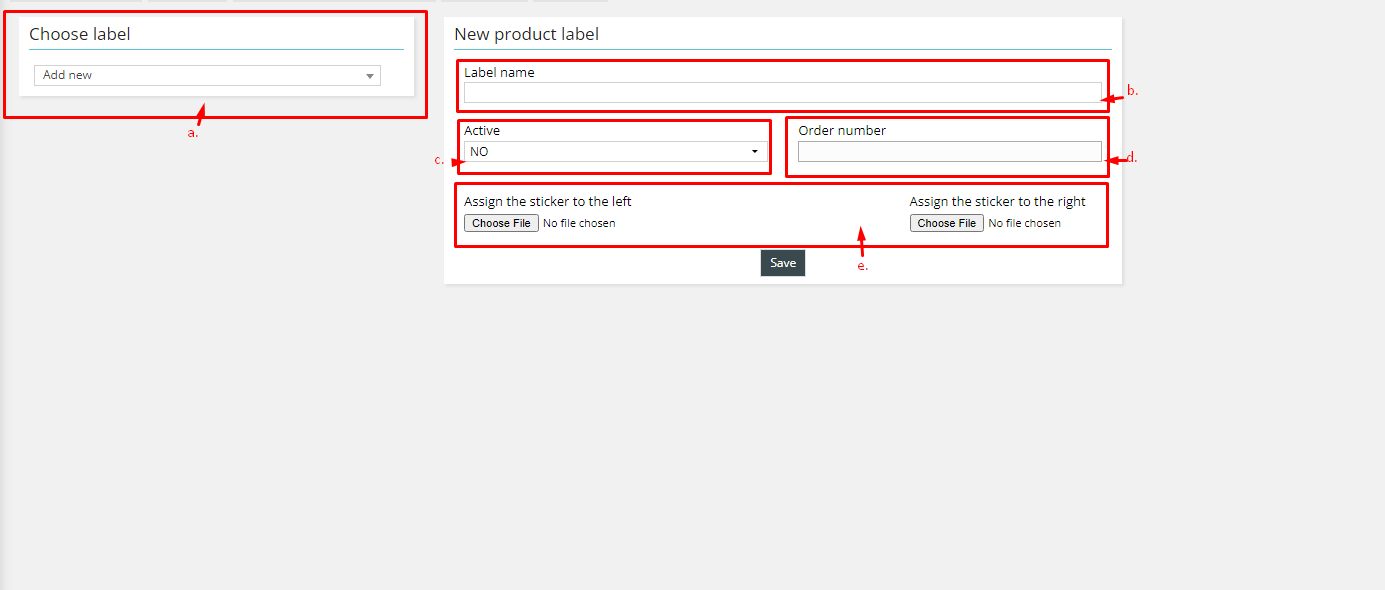
In a drop-down menu you can select existing labels or you can create new by choosing Add new.
Label name (b)In a field, you enter a label name. This field is obligatory.
Display activation (c)If you select YES from the drop-down menu, then the label will be visible in the webshop. If NO is chosen, it will not be shown.
Order number (d)The order number is a label type displayed on the home page.
Assign the sticker to the left or right (e)You can choose the label/sticker from your device and display it on the left or the right side of the product picture on the homepage, group view or product view.
a) Units of measure;
b) Name of the unit of measure;
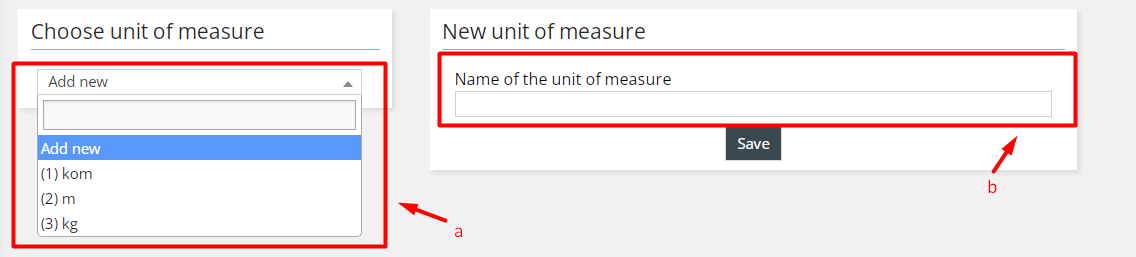
In a drop-down menu Add new is chosen to create a measurement of unit. By choosing the existing ones, there is a possibility of their changing.
Name of the unit of measure (b)You enter in a field the title of the unit of measure or you change the existing title; this field is obligatory.

In a drop-down menu by choosing Add new, we create a new tax rate. By choosing the existing one, there is a possibility of its changing.
Name of the tax rate (b)You enter in a field the name of the tax rate or you change the existing title; this field is obligatory.
Tax% (c)A numeric value is entered in a field; and it is expressed in percentages (%) .
Type (e)Type description of the tax rate;
Active (f)When Active is marked, a tax rate is visible in administration.
Default (g)When Default is marked then that tax rate will be listed as default.
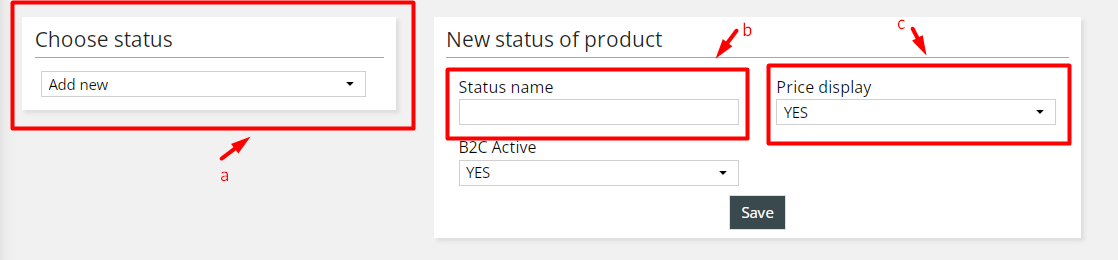
By choosing Add new in a drop-down menu, we create a new order status. By choosing the existing one, there is a possibility of its changing.
Status name (b)The name of the status is entered in a field, or the existing one is changed. This field is obligatory.
Active (c)If YES is chosen in drop-down menu called active, the status will be shown in administration.
When a product is assigned a new status then instead of Add to a cart, an assigned status will be written. Products having status, cannot be ordered. Status example – Call, Soon on stock, etc

By choosing Add new in a drop-down menu, we create a new order status. By choosing the existing one, there is a possibility of its changing.
Name of the status (b)The name of the status is entered in a field, or the existing one is changed. This field is obligatory.
Active (c)f YES is chosen in Active drop-down menu, the status will be shown in administration.
The status of order stands for additional statuses at orders, and they are used for easier keeping of orders by creating statuses you want. E.g. Sent by Marko, Ordered from supplier, Collected,etc.

By choosing Add new in a drop-down menu, we create a new Configurator.. By choosing the existing one, there is a possibility of its changing.
Configurator name (b)The name of the configurator is entered in a field, or the existing one is changed. This field is obligatory.
Active (c)If YES is chosen in Active drop-down menu, the configurator will be shown in the shop.
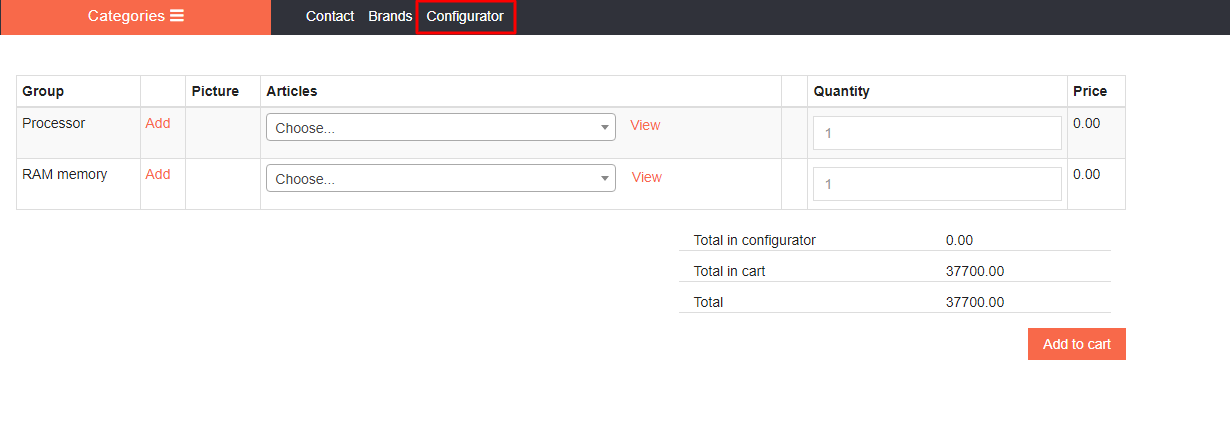
It serves for a visitor to order his goods easier (e.g. Computer configuration, Fishing equipment, Camping equipment, All for painting, etc.)
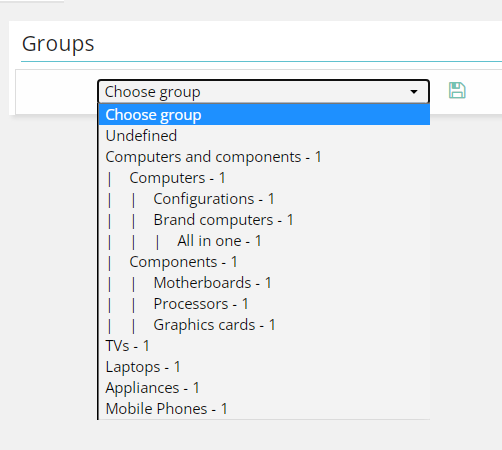
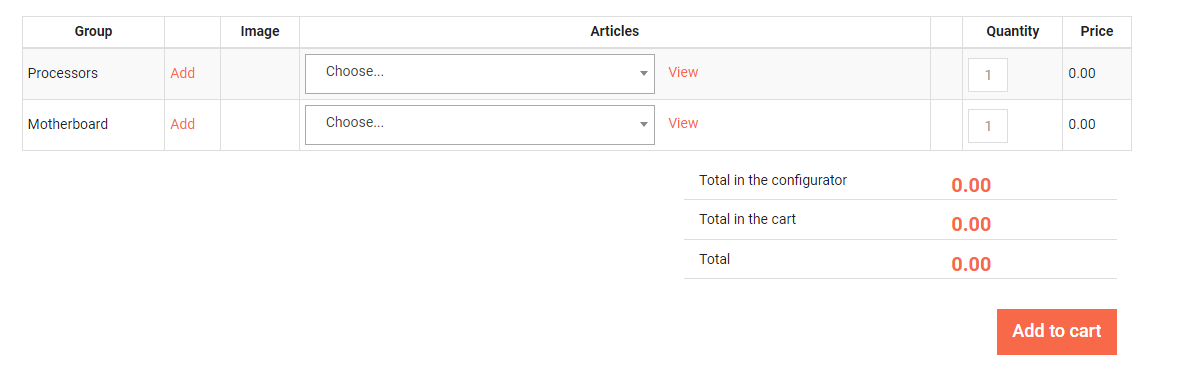
After the configuration of the Configurator, groups are listed on the left side in the menu. When a group is chosen, it is recorded by clicking on Save (green floppy disc). To add one more group below it, a new column will appear and in a drop-down menu you need to choose another group. If you want to delete a column, click on red x.
Created confugurator will be visible on the page Configurator in a shop.
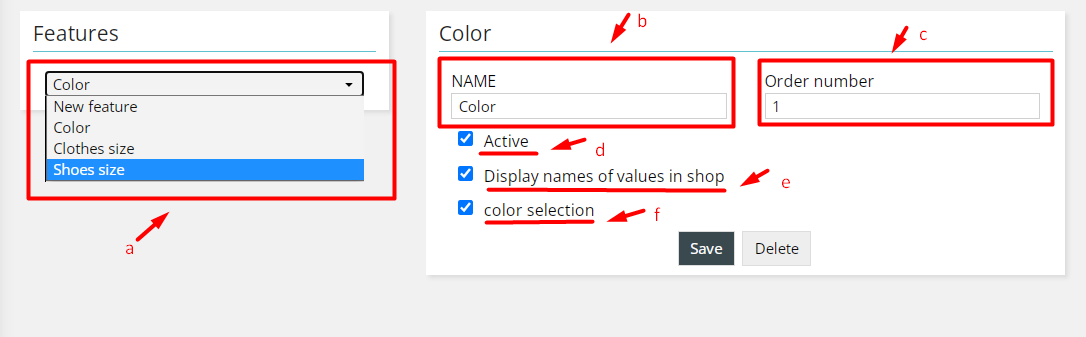
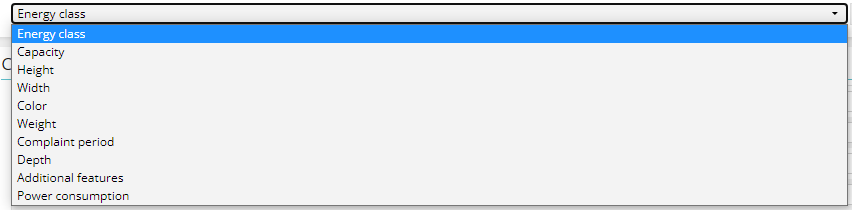
On this card you can create the features that can be later assigned to products:
Features (a)In a drop-down menu New characteristic is chosen in order to create a new one. By choosing the existing characteristic, there is a possibility of its changing.
Name of the feature (b)Here the name of the characteristic is entered; obligatory field.
Order number (c)An order number of the feature.
Active (d)When the field is marked, the characteristic will be seen in the administration.
Display the names of the values (e)When the field is marked, in field of characteristic at product having that characteristic, the name of the value of the characteristic will be shown.
Color selection (f)When it is selected, there is a possibility of parallel color and value display.
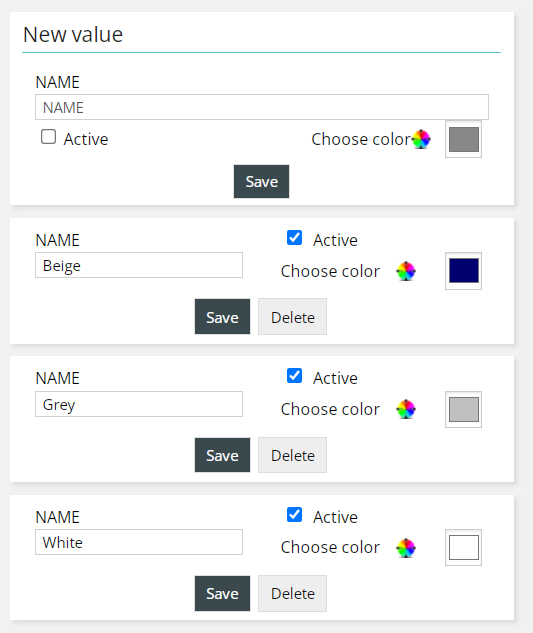
Creation of the valueIn a field, enter the name of the value and mark that the value is active. If it is about a colour, then by clicking on colour selection, a field appears and a suitable colour is chosen.
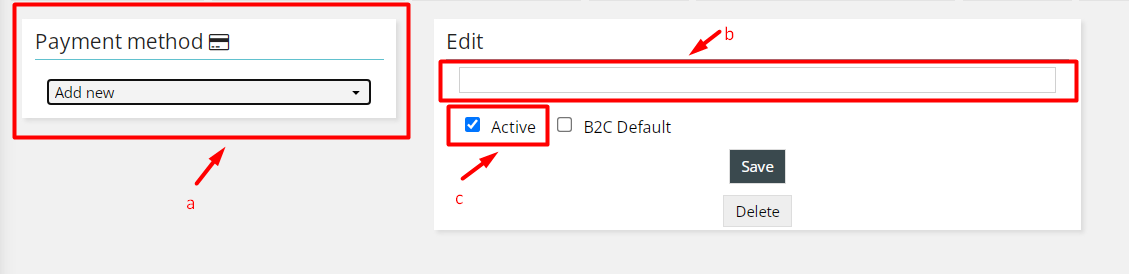
In a drop-down menu Add new is chosen to create a new payment method. By choosing the existing one, there is a possibility of its changing.
Name (b)The name of the payment method is entered in a field, or the existing one is changed. This field is obligatory.
ActiveIf `Active` is marked, then a visitor will see in a cart a possible payment method.
B2C defaultWhen this field is ticked, the chosen payment method is selected by default when your customers make orders.

In a drop-down menu Add new is chosen to create a new Payment method. By choosing the existing one, there is a possibility of its changing.
Name (b)The name of the way of payment is entered in a field, or the existing one is changed. This field is obligatory.
Active (c)If `Active` is marked, then a visitor will see in I cart a possible way of the shipping.
Shipping costs by weight On this card, parameters for shipping costs are entered. Depending on the overall weight of the ordered products, shipping costs concerning the weight of the product are added. For weight to be in function, it has to be activated in the settings. This option cannot work together with shipping costs by value.
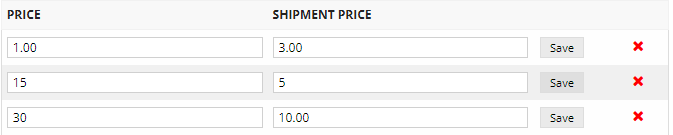
 Shipping costs by value
Shipping costs by value On the card shipping costs by the value you may enter what price you will pay for the shipping. E.g, if the goods are over 30 euros, the shipping cost will not be shown in a cart. If it is less than 30 euros, the shipping cost will be shown for the shipping you entered in the field Shipping price. For this option to be in function, it has to be activated in the settings. This option cannot work together with shipping costs by weight.
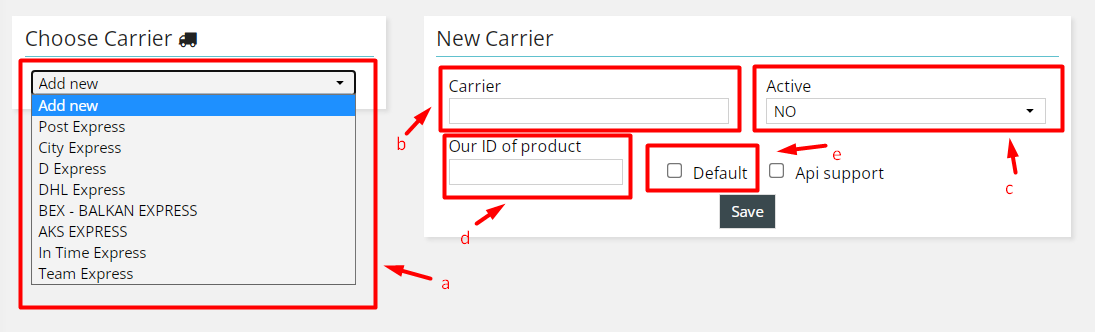
In a drop-down menu Add new is chosen to create a new courier service. By choosing the existing one, there is a possibility of its changing.
Name of the courier (b)In a field the name of the courier service is entered. This field is obligatory.
Active (c)If YES is chosen in Active drop-down menu, the courier service will be shown in the administration. The choice of courier service in the order is used to easily track delivery statistics.
Courier ID (d)This is a code that you receive from a courier service you have the contract with.
Default (e)When a button default is ticked, it will be shown first in order.

In a drop-down menu currencies are selected.
Exchange rate entry (b), (c)In a field, you enter an exchange rate of that day. A shop takes an average rate exchange when the currency is changed. When the changes are saved, the exchange rate of that day will be shown (d).
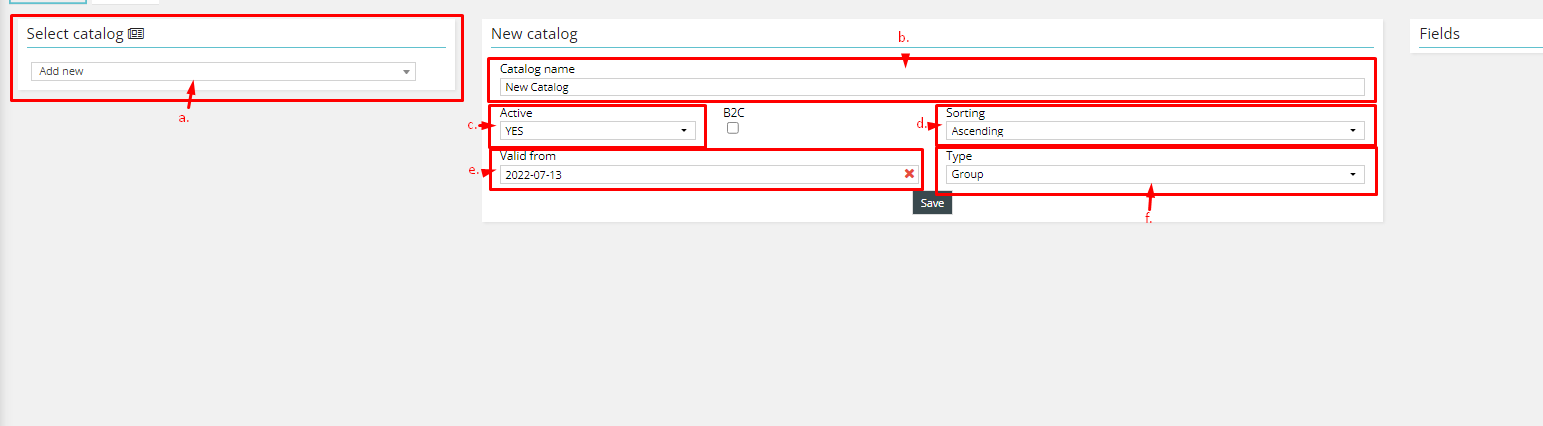
In a drop-down menu, you can select the existing catalogs to edit or add a new one.
Catalog name (b)You can enter the name of the catalog in this field. This field is obligatory.
Active and B2C checkbox (c)If YES is chosen in the Active drop-down menu, the catalog will be shown in the administration. By ticking the B2C active it will be visible on the Catalog page.
Sorting (d)You can set product sorting in the catalog by ascending, descending
Types (e)In a drop-down menu, you can select the existing catalogs to edit or add new.
Field input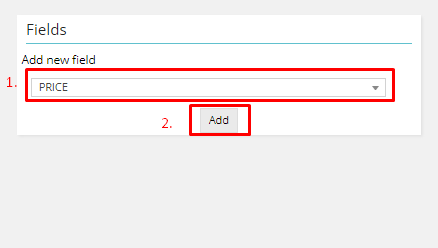
To add new field select one of the options in the drop-down menu and click on Add. New column can be added by choosing another one and by clicking on the button Add again. After you have added all the fields, you can drag and drop to determine the display order.
Add products to a catalogTo add products to a catalog, you need to navigate to the Products menu, then on the product list select the products you want, and on the right click select Catalog. A new screen will appear where you can select the Catalog from the drop-down menu (1) nad add them by clicking on + (Assign).

After you have added products, the catalog will be ready and you can access it on the Catalog page.
On the survey menu, you have four sections: Choose Survey, Survey, Questions and Answer. The Questions and Answer sections will be visible when you enter the Survey name and click Save.

Choose the existing survey from the drop-down menu or add new.
Survey name (b)Enter the name of the survey. This is the obligatory field.
Display activation (c)Depending on whether you want the Survey to be active, tick the Active checkbox.
Display options (d)If you want the survey to apply to everyone who visits your store, tick the checkbox Choosen. When you want to link the survey to an order and a customer who ordered a product, tick the checkbox Choosen (order). Click the Save button to save the content and create your survey.
Add/Change Question (e)Click on Add/Change button to add new question.
Question text (f)In this text box you can enter the question text. This is an obligatory field.
Add answer (g)By clicking on the + sign the answer section will appear.
Delete question (h)Delete a the question you are editing by clicking on the x button.
Answer type (i)Answers can be displayed as a text or checkbox. You can select one of these option in this drop-down menu.
Question display activation (j)Tick the checkbox Action and the question will be displayed on the webshop.
Save question (k)Click on the tick mark to save changes.
Answer Add/Change (l)To add new answer click on the Answer Add button.
Answer text (m)In this text box you can enter the answer text. This is an obligatory field.
Answer display activation (n)Tick the checkbox Action and the answer will be displayed on the webshop.
Save/Delete answer (o)Click on the tick mark to save changes. Delete an answer you are editing by clicking on the x button.
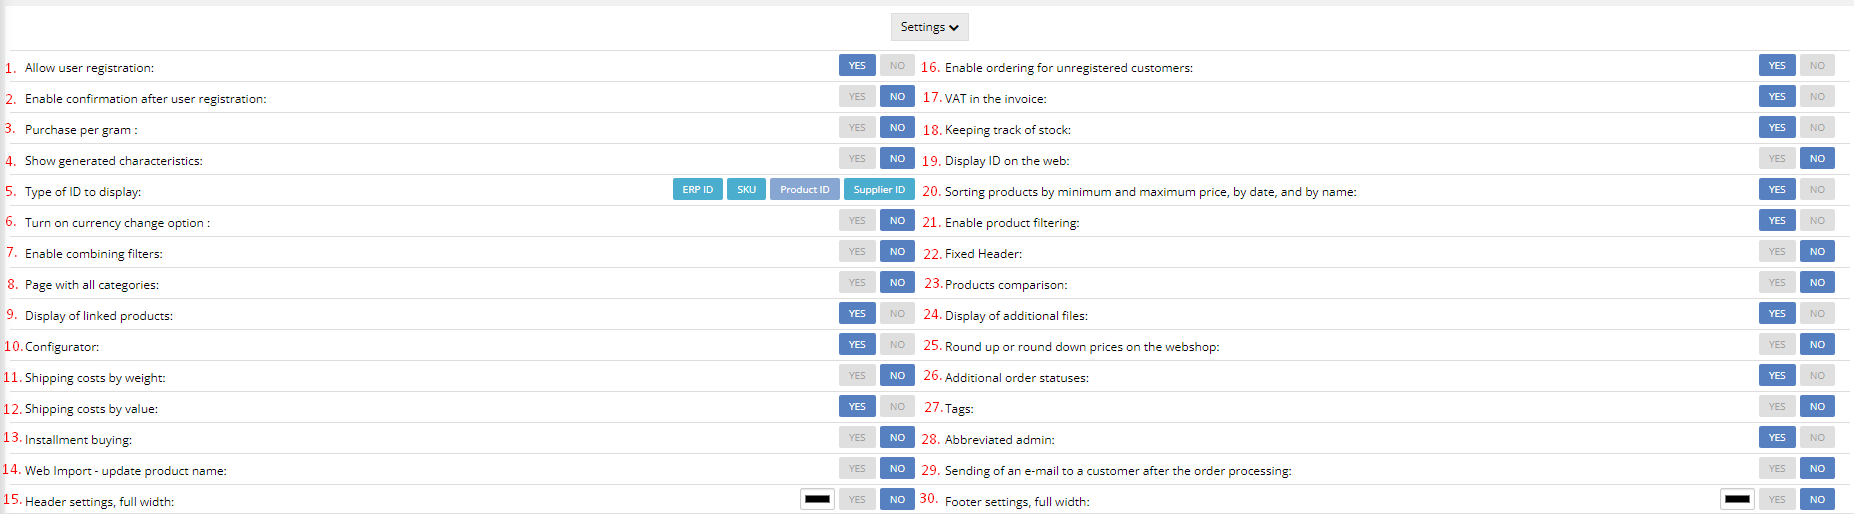
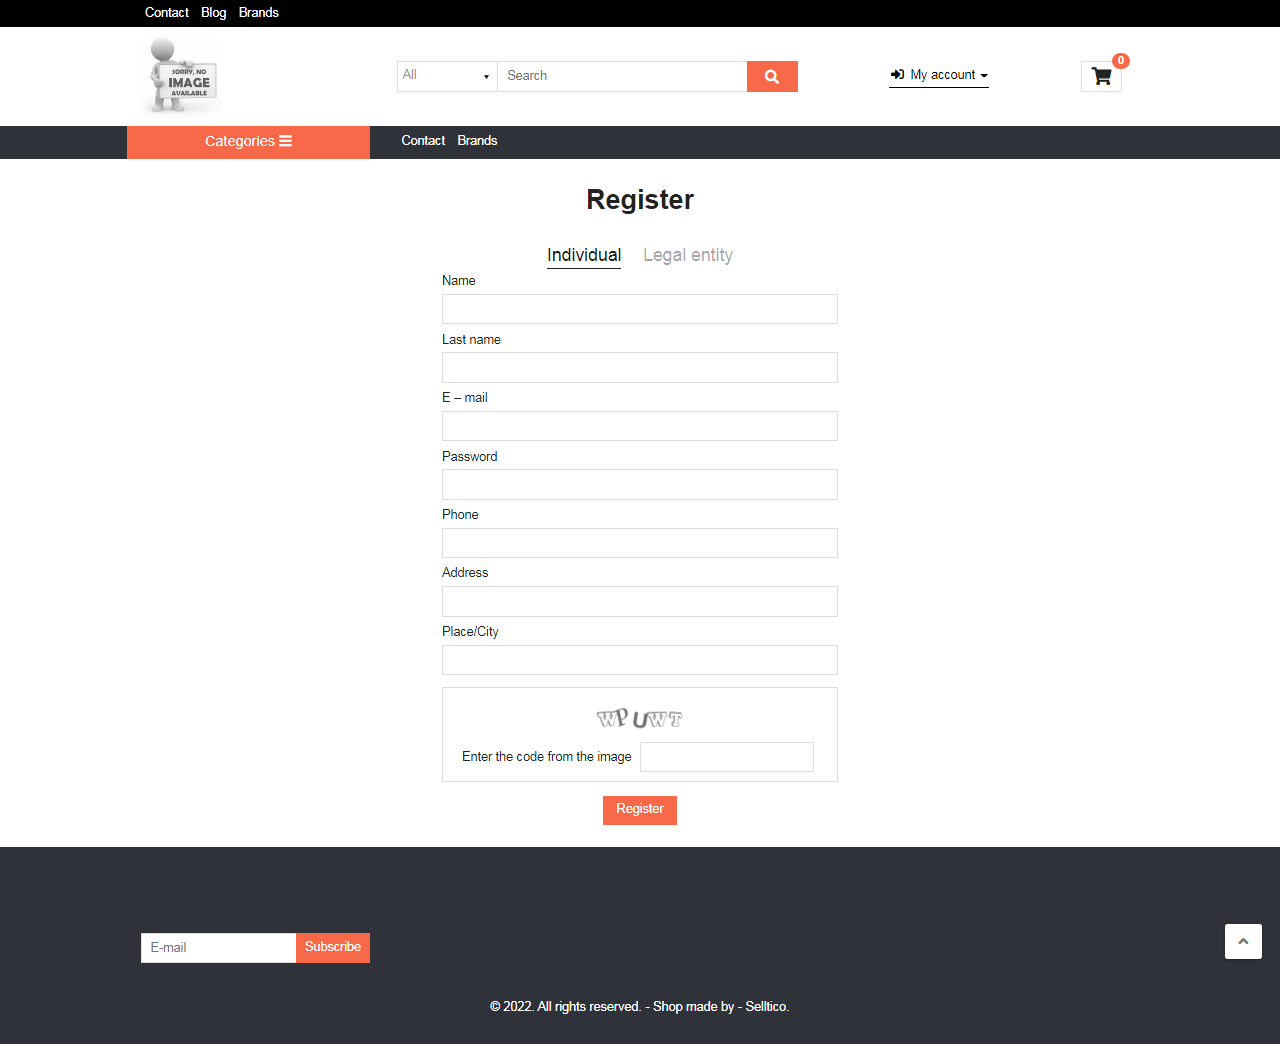
1. Allow the user registration: If YES is on, your customers will be able to register See the image
2. Enable confirmation after user registration: If YES is on when a customer is registered it will be obligatory to confirm the registration from his e-mail.
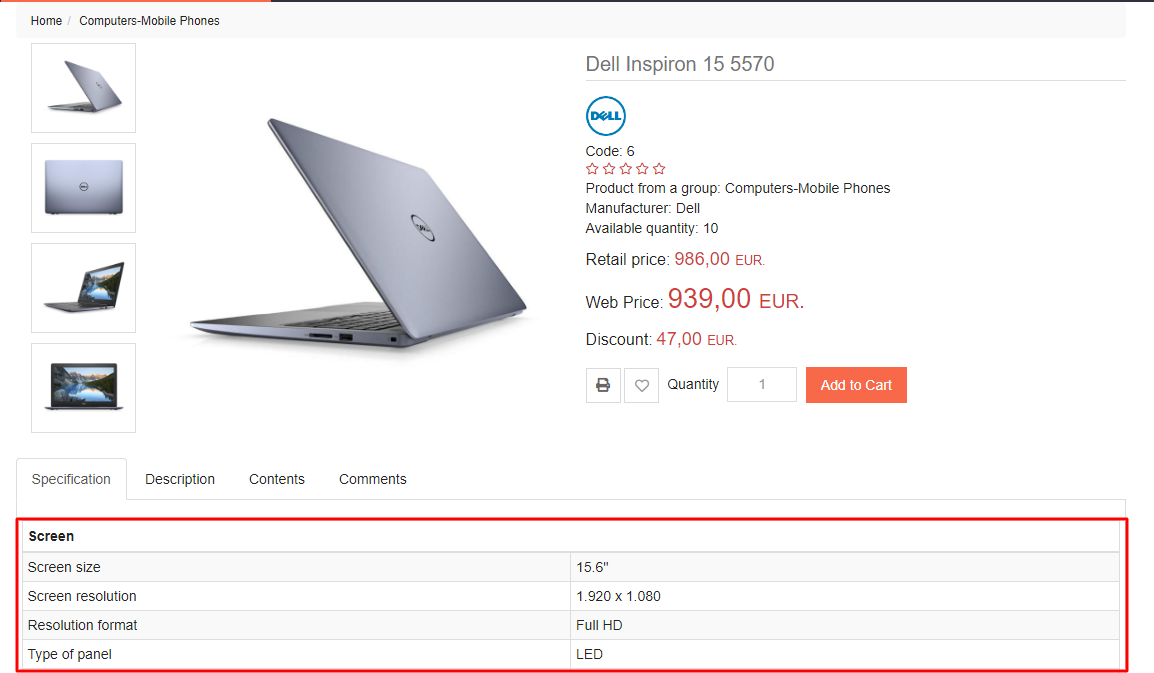
3. Purchase per gram: If YES is selected, customers can order the goods by grams.
4. Show generated characteristics: If YES is selected, the generated characteristics will be displayed in the group view or on a certain page. See the image
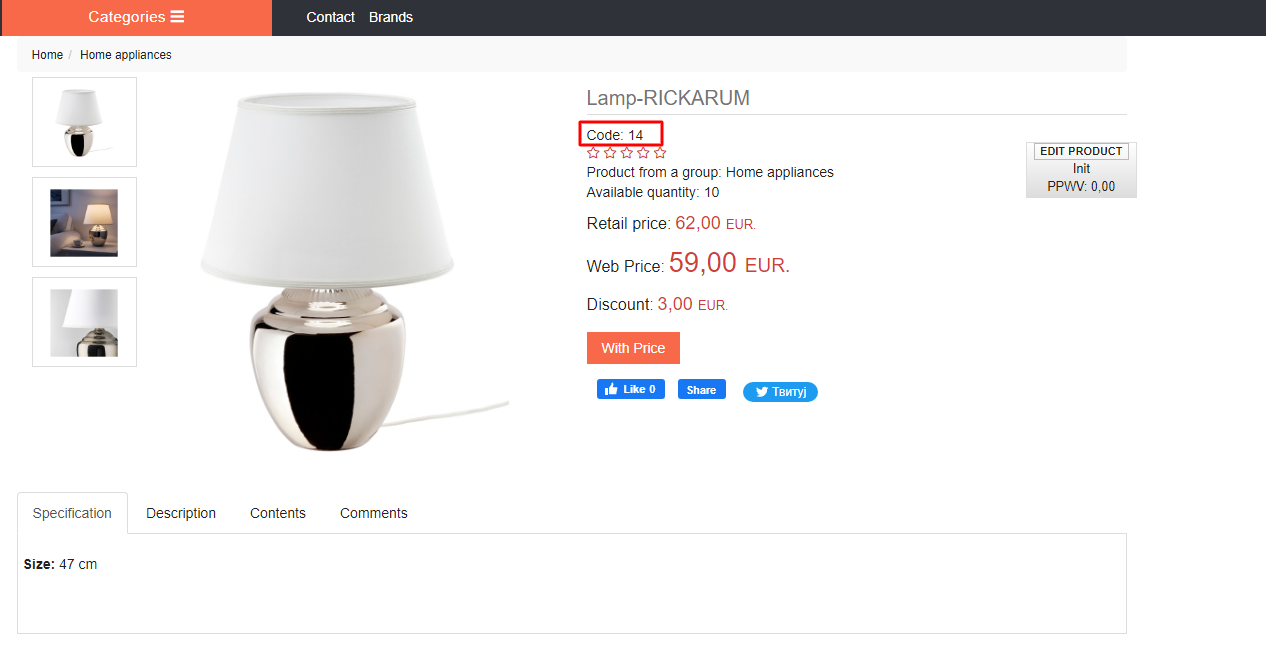
5. Type of ID to display: The selected code is shown on a detailed edit page of the product. For a code to be visible, an option Code display on the web must be enabled. An ERP ID represents a product code from your ERP software; SKU is a store-keeping unit code, the Product ID is a code assigned in the Selltico admin panel, and Supplier ID – represents a code for goods you receive from your suppliers (not your goods).
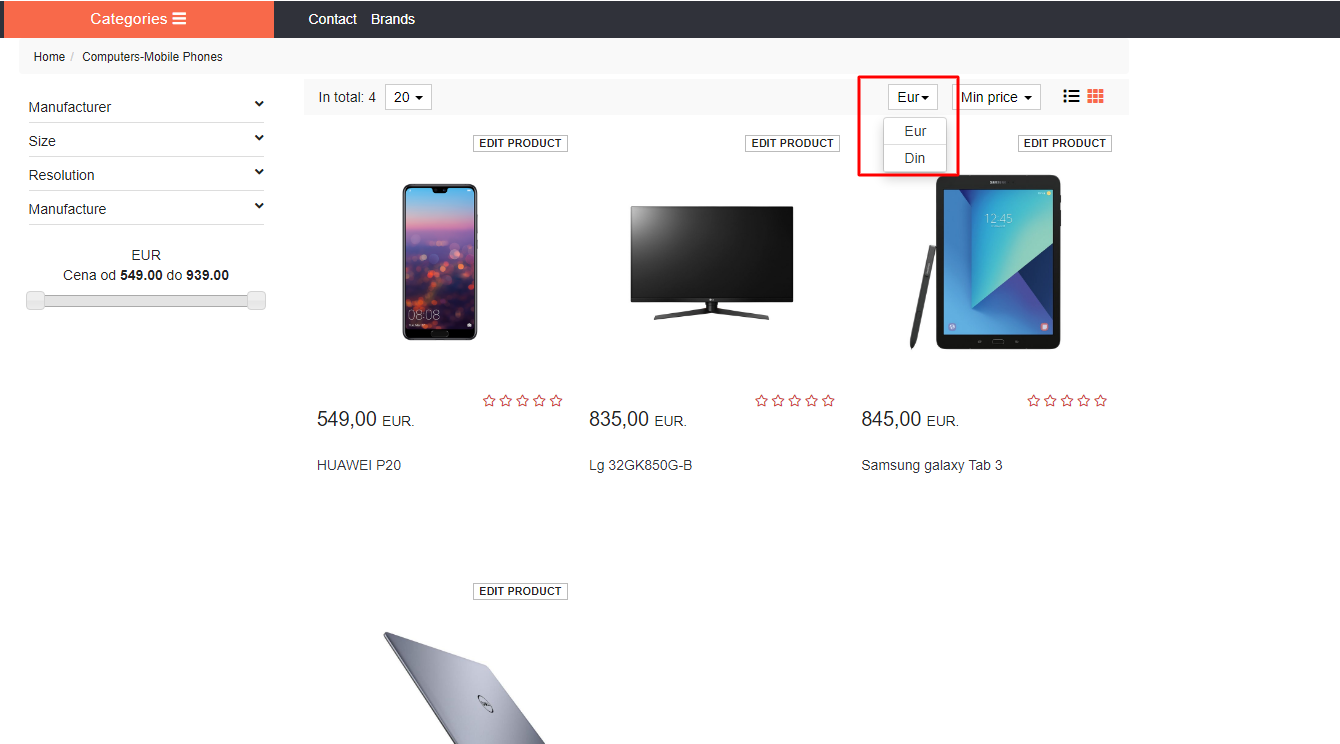
6. Enable the currency change option: If YES is selected, in the product list there is a drop-down menu with a choice of currency for price display. A user can choose between the currency in Euros or other currencies. See the image
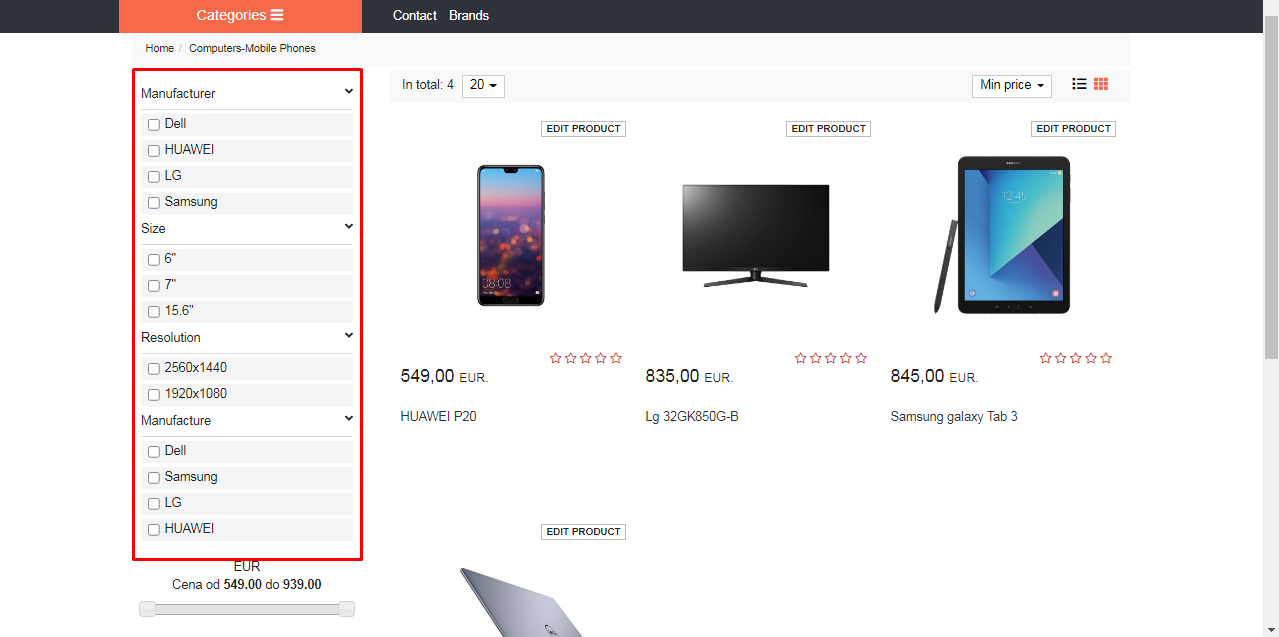
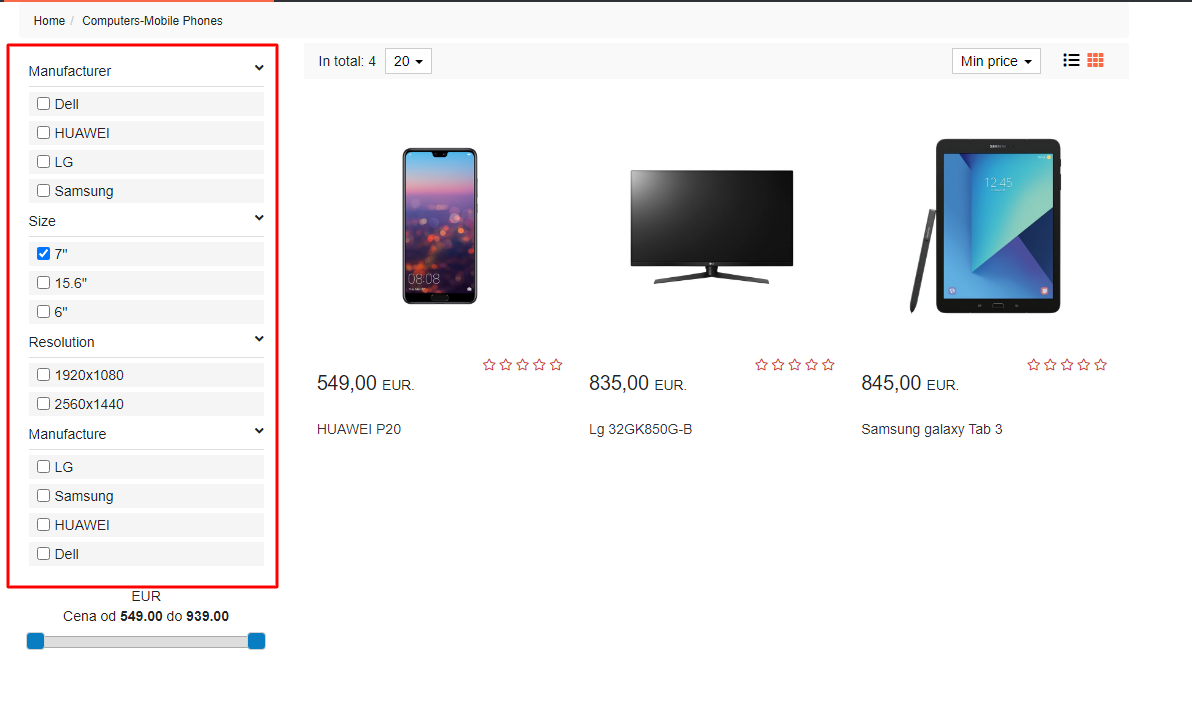
7. Enable combining filters: If YES is selected, the number of product filters (how many products have an assigned filter) is shown. It is possible to choose more filters. If NO is selected, it is possible to choose only one filter.
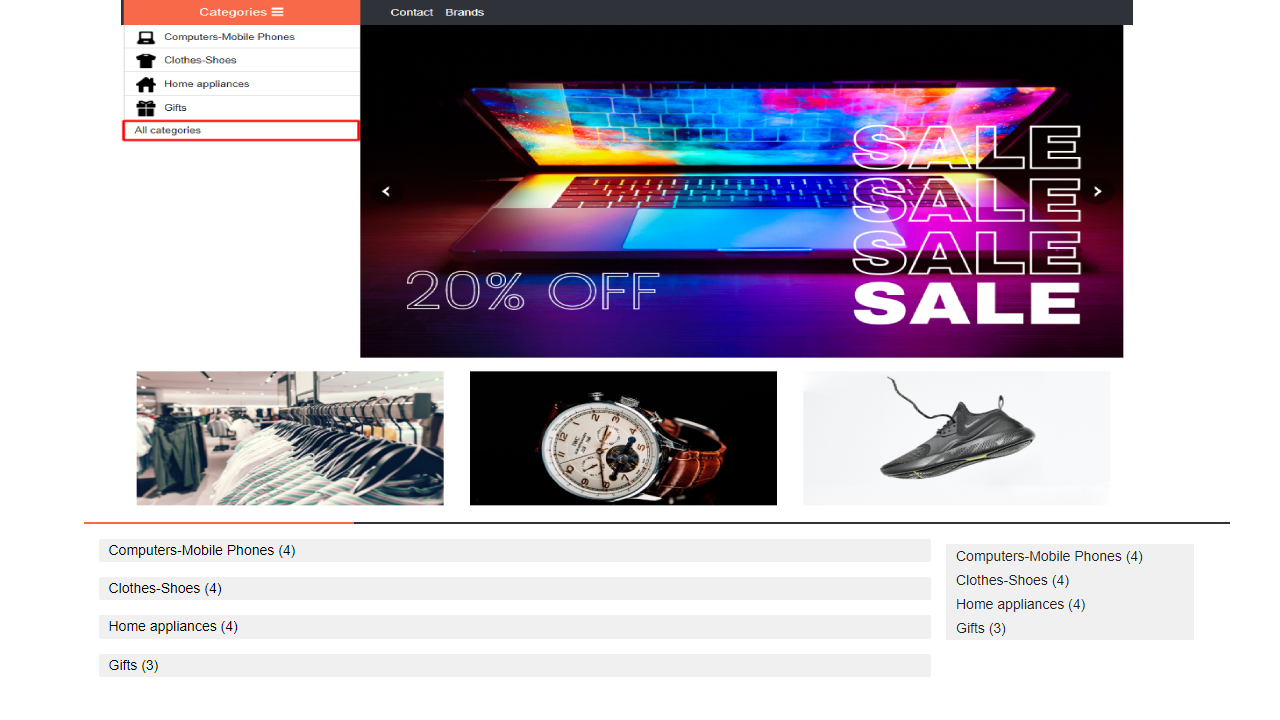
8. Page with all categories: If YES is selected, at the bottom of the category there is a link to All categories. By clicking on it, the page where all the groups and subgroups are listed in your shop opens. See the image
9. Display of linked products: If YES is selected, at the bottom of the detailed product display, there is a product that was previously connected to the main product. Instructions for related products you may see here. See the image
10. If YES is selected, you can create and display configurators. Instructions on how to use configurators you may see here. See the image
11. Shipping costs by weight: If YES is selected, when customers order a product, the delivery is counted by the weight of the products. Shipping costs by weight are formed in codebooks. Here you may see the instructions on how to form them. See the image
12. Shipping costs by value: If YES is selected, the costs of shipping are determined by the value of ordered goods. They are formed in codebooks . here you may see the instructions. See the image
13. Installment buying: If YES is selected, the customers can pay by installment.
14. Web import - update product name: when NO is selected, the name of the product won't be synced to ERP names.
15. Header settings, full width: If YES is selected, the header will be displayed from edge to edge of your webshop.
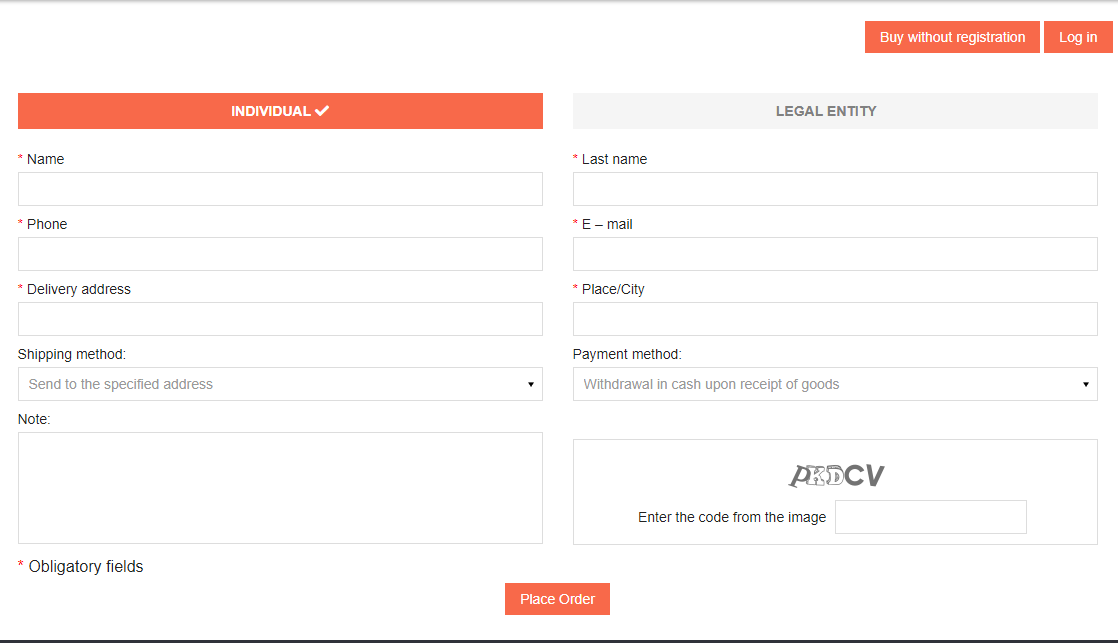
16. Enable ordering to unregistered users: See the image
17. VAT in the invoice: If YES is selected, the VAT will be included in the order invoices.
18. Keeping track of stock: If YES is selected, the quantity of products is counted and reduced after customer orders. If NO is selected, a customer may order any quantity.
19. Display ID on the web: If YES is selected, the Product ID code is shown on a more detailed page. See the image
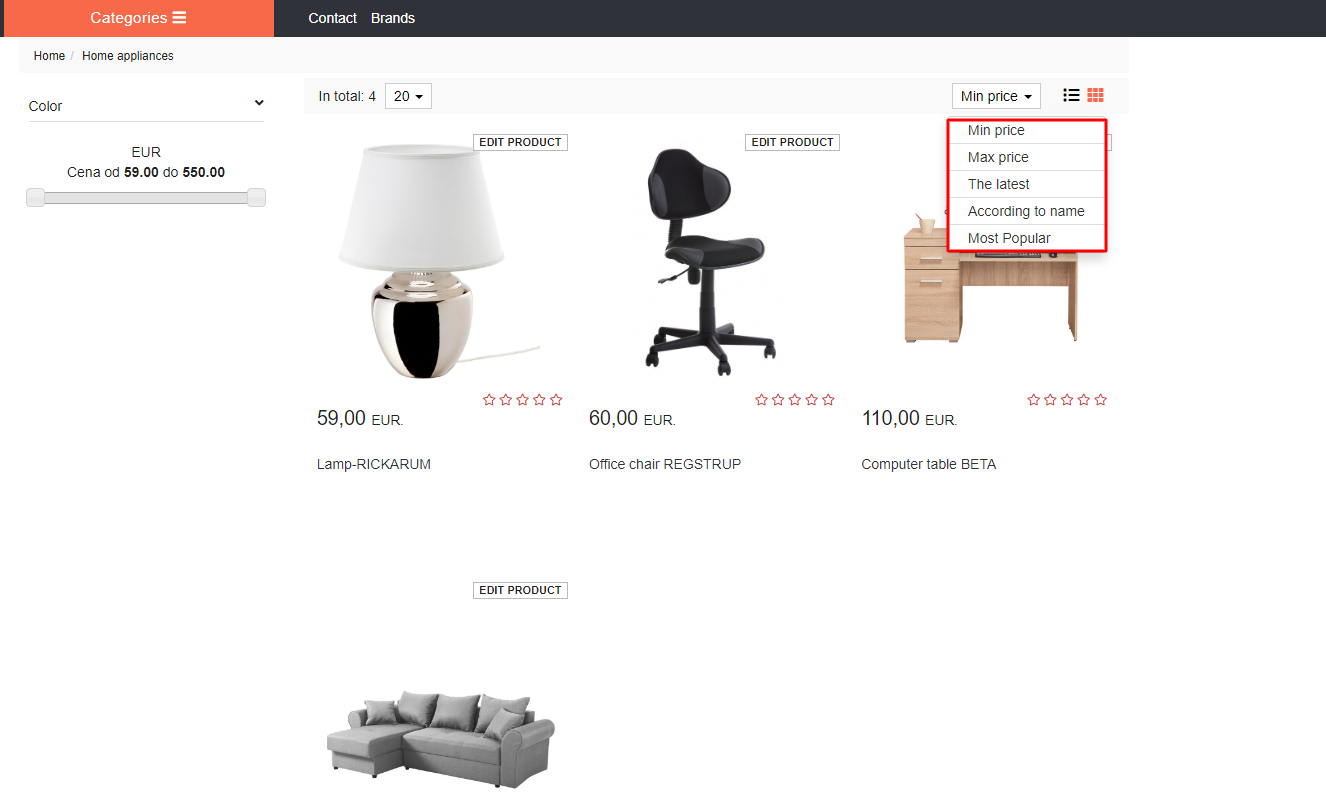
20. Sorting products by minimum and maximum price, by date, and by name: If this option is enabled, in the product list, a drop-down menu to choose a type of product sorting on the webshop appears. There is sorting by minimal and maximal price, by the latest added products, and by name. See the image
21. Enable product filtering: If YES is selected, filters (of generated characteristics) appear. Filters can be shown in the product list on your webshop.
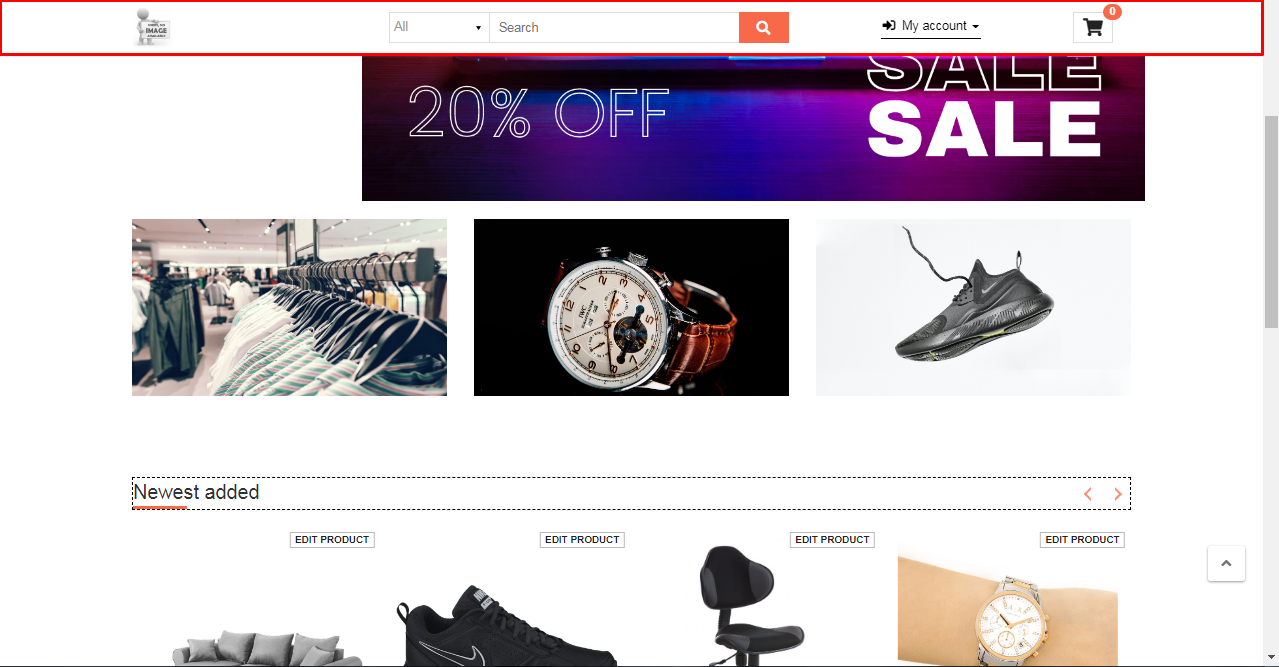
22. Fixed header – it fixes the upper search menu and a cart. See image
23. Product comparison: If YES is selected, a comparison of the products from the same group is done and filters are assigned to the characteristics. See image
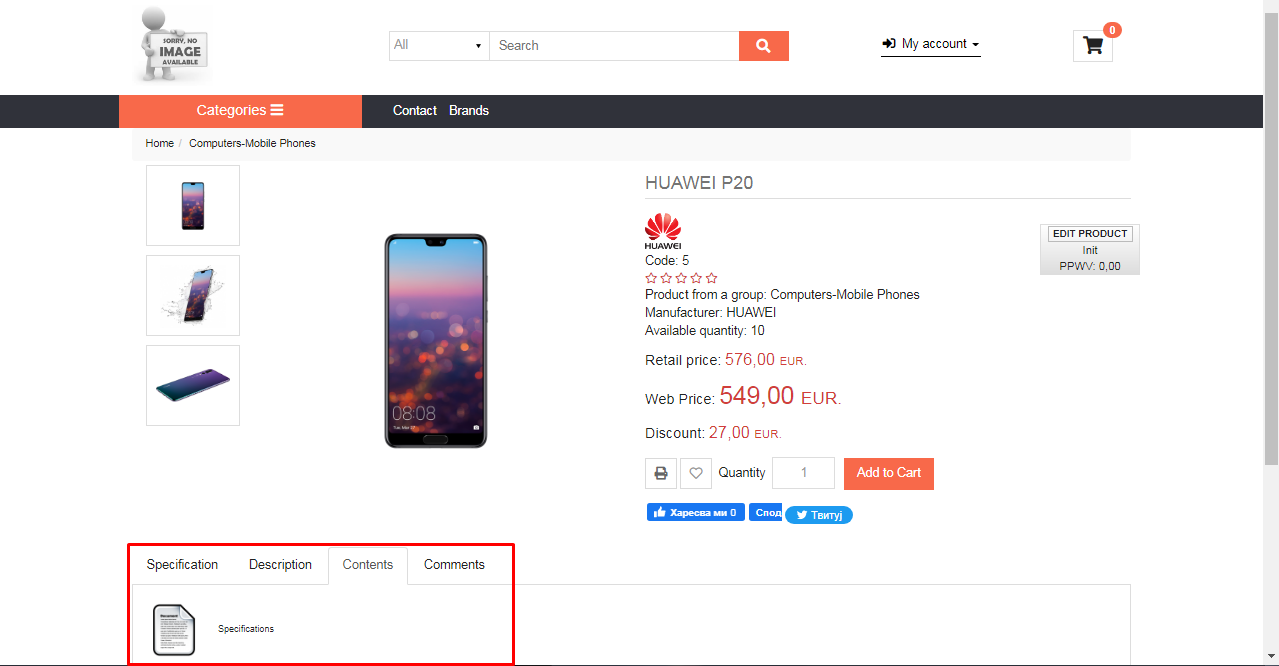
24. Display of additional files: If YES is selected, in a detailed product display a card Contents is activated. It is possible to add documents or videos. See image
25. Round up or round down prices on the webshop: If YES is selected, the prices on the webshop will be round up if decimals exceed .5, and rounded down if the decimal is smaller than .5. Ex. Price 19.99 will be round up to 20 euros.
26. Additional order statuses: If YES is selected, there will be additional statuses that you had previously created in Codebooks when processing orders from customers. You may create them by yourself and they describe a phase the order is in.
27. Tags: Tags: If YES is selected, in a detailed product display, tags are displayed and used. Tags are the words and sentences that may be assigned to more products. When clicking on a certain tag, a product list with the same tag is opened to a customer. An instruction for tags you may see here. See image
28. Abbreviated admin If YES is selected, you activate quick product administration on the online shop updating the product basic data. You may see instructions for the abbreviated admin here. See image
29. Sending of an e-mail to a customer after the order processing: If Yes is on when an order is processed, an e-mail is sent to a customer. E-mail is sent when an order is accepted and realized.
30. Footer settings. Full width: If YES is selected, the footer will be displayed from edge to edge of your webshop.